Faveo Helpdesk K8s
Deploying Faveo Helpdesk on managed Kubernetes Cluster
![]()
Introduction
In this article, we’ll be deploying Faveo Helpdesk app on top of Kubernetes. But first, you may be wondering why we’re using Kubernetes and Docker for the deployment of our Faveo Helpdesk application. Kubernetes allows us to derive maximum utility from containers and build cloud-native applications that can run anywhere, independent of cloud-specific requirements. With Kubernetes, we can automatically deploy, scale, and manage our application. We will go through the steps one by one required in deploying Faveo Helpdesk app.
Prerequisites
- A Managed Kubernetes 1.28+ cluster with your connection configuration set as the kubectl default on the local machine from which you access the cluster. You can read more about installing kubectl in the official documentation.
- The Helm 3 package manager installed on your local machine. You can follow the official guide here to install Helm 3.
- A Managed Mysql 8.0+ or MariaDB 10.6+ database in the same region as of the Cluster.
- A Managed Redis database in the same region as of the Cluster.
- Spaces bucket in the same region. (We recommend to have all this requirements in the same region as of the cluster for better performance and good connectivity among them)
- A fully registered domain name with an available A record.You can use the domain registrar of your choice. Don’t worry about associating your domain’s A record with an IP at this time. Once you deploy Nginx ingress controller and your Load balancer is attached to your cluster, you will connect your_domain to the proper IP.
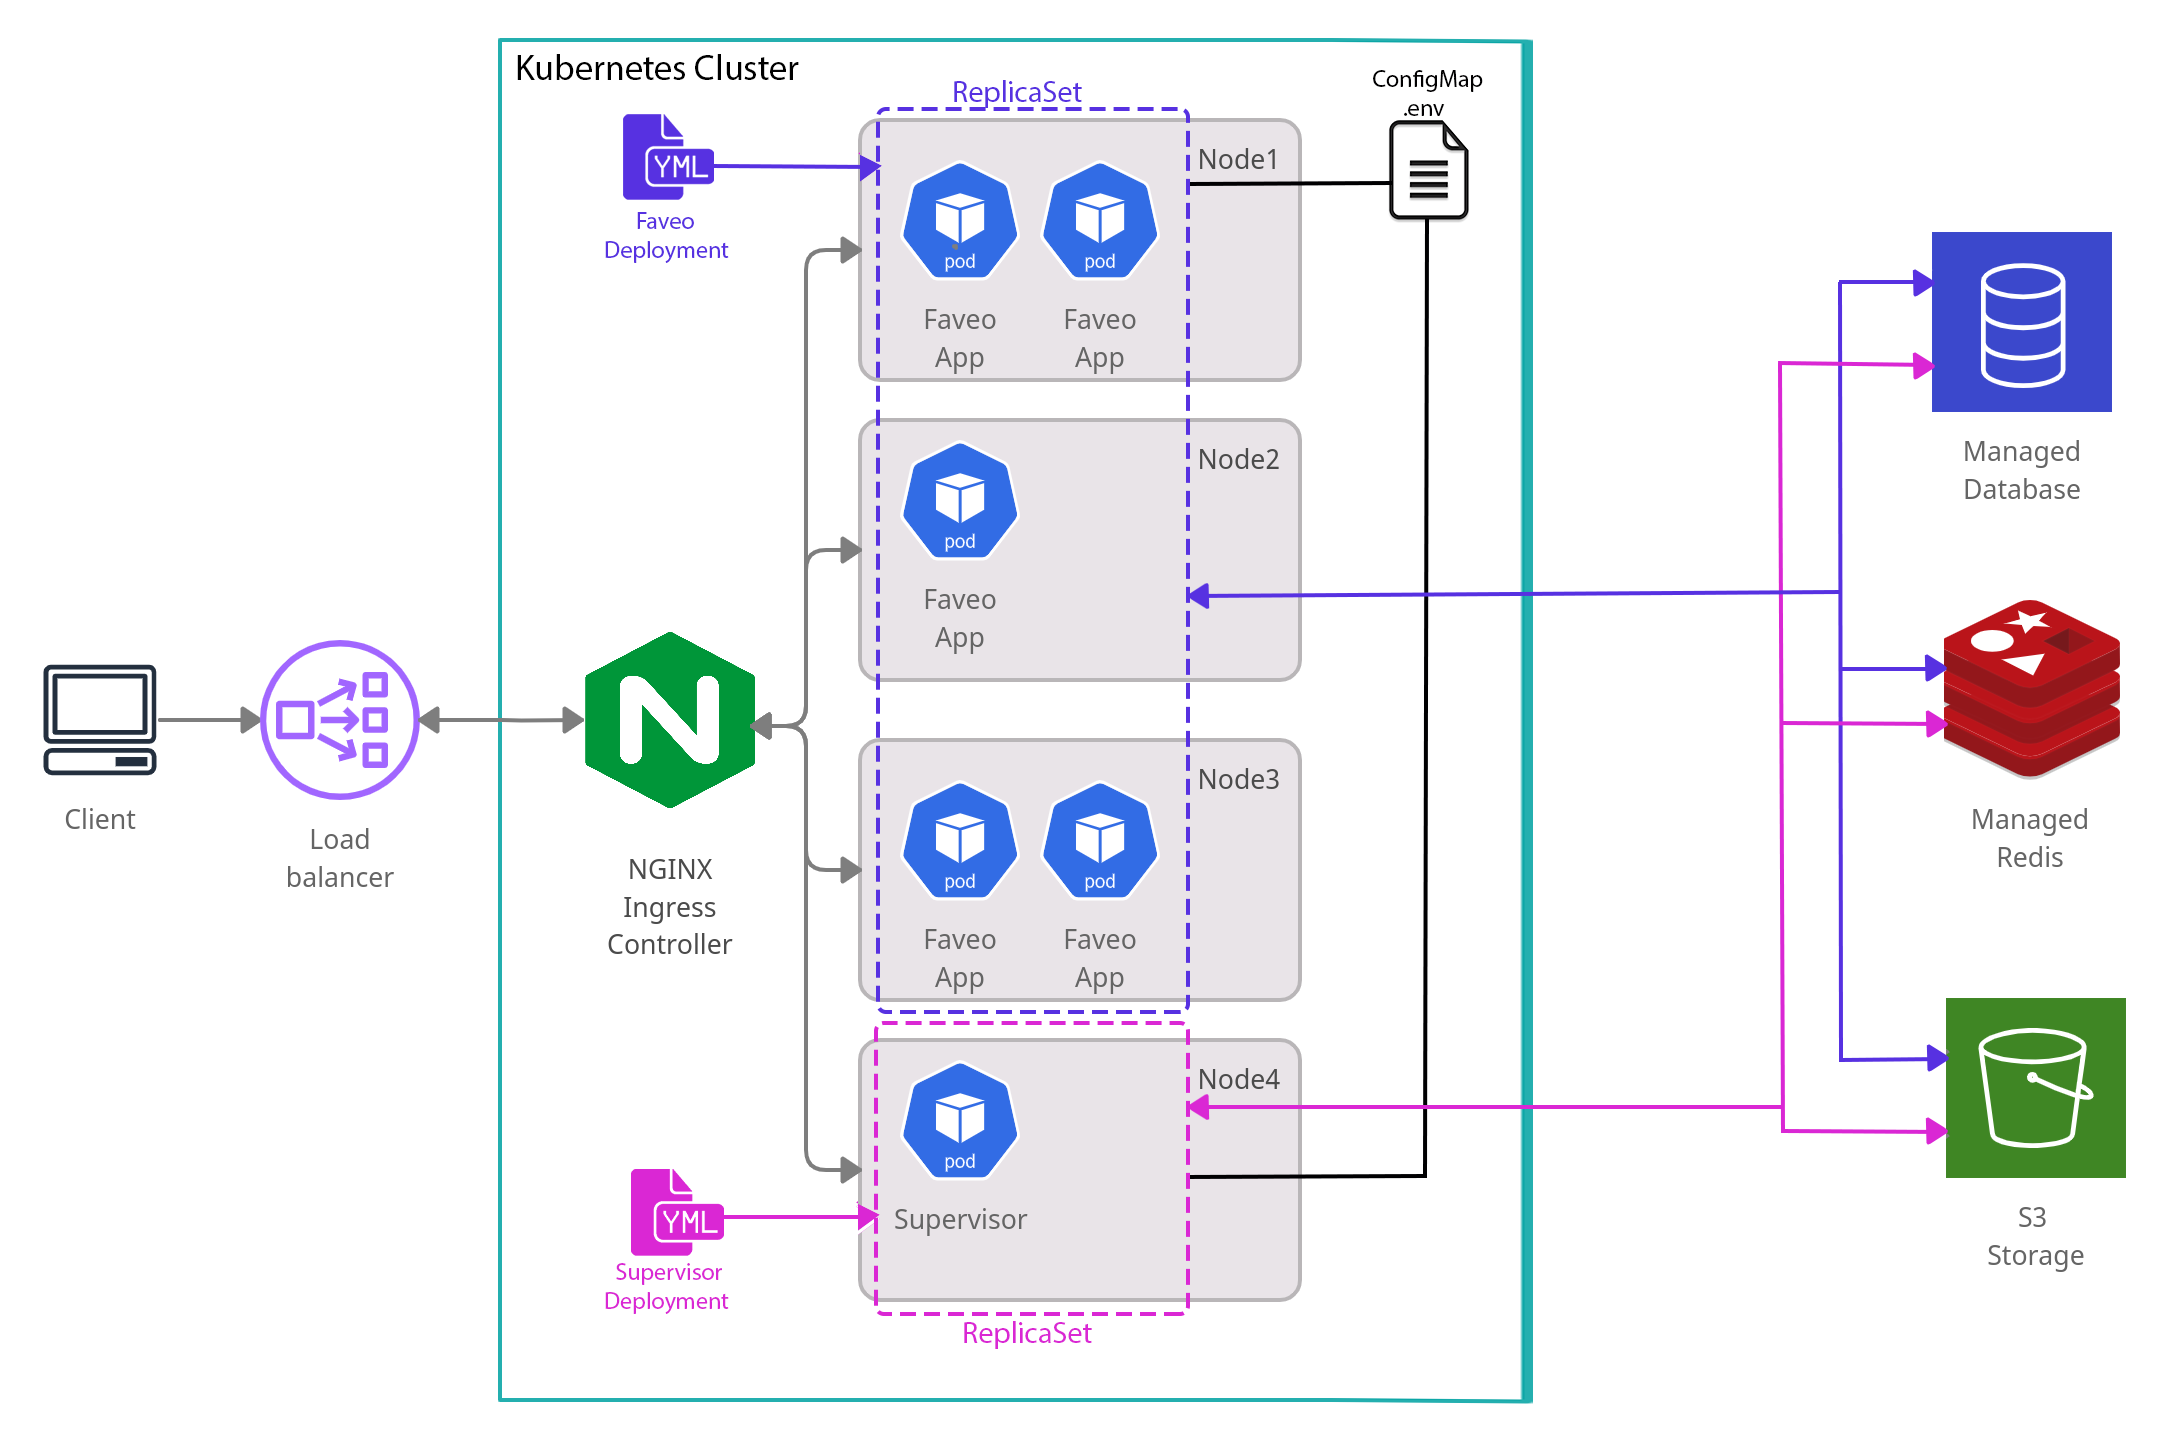
Before beginning the installation take a look at the simplified Architectural Diagram of Faveo Helpdesk on kubernetes. This will help you understand the different components used and how they are inter connected to make Faveo Helpdesk work.
Note: Digital Ocean allows you to install some of the resources or addons via one-click installers. But we recommend to follow the steps in this guide, which uses the Offcial documentaion of that addons to install them, as you will have complete control over there versions.
Step 1: Configuring and Deploying Faveo Helpdesk
In this step, you’ll create a Kubernetes object description file, also known as a manifest, for a deployment. This manifest will contain all of the configuration details needed to deploy your Faveo app to your cluster.
First, you’ll need a directory to store all your YAML configuration files. Create a new directory of your choice and create and open deploy-faveo.yaml. Add the below configurations, making sure to replace order-no and license-key with your order number and license in the CURL Api. Leave the commented lines as it is. The reason for commenting certain lines here will be explained later in Step 6.
apiVersion: v1
kind: Service
metadata:
  name: faveo-svc
  namespace: faveo
spec:
  type: ClusterIP
  ports:
  - port: 80
    targetPort: 80
  selector:
    app: faveo-pods
---
apiVersion: apps/v1
kind: Deployment
metadata:
  name: faveo-deploy
  namespace: faveo
spec:
  replicas: 1
  selector:
    matchLabels:
      app: faveo-pods
  template:
    metadata:
      labels:
        app: faveo-pods
    spec:
      containers:
      - name: faveo-apache
        image: ladybird/faveo-k8s:apache-8.2.25
        resources:
          limits:
            memory: 700Mi
            cpu: 1
          requests:
            memory: 600Mi
            cpu: 800m
        livenessProbe:
          httpGet:
            path: /probe.php
            port: 80
          initialDelaySeconds: 5
          timeoutSeconds: 5
          periodSeconds: 10
          failureThreshold: 1
        readinessProbe:
          httpGet:
            path: /probe.php
            port: 80
          initialDelaySeconds: 5
          timeoutSeconds: 5
          periodSeconds: 10
          failureThreshold: 1
        volumeMounts:
        - name: volume-data
          mountPath: /var/www/html
#        - name: cm
#          mountPath: /var/www/html/.env
#          subPath: .env
#        - name: ca-certificates
#          mountPath: /usr/local/share/ca-certificates/faveorootCA.crt
#          subPath: faveorootCA.crt
      initContainers:
      - name: fetch
        image: ladybird/faveo-k8s:fetcher-v9.2.2
        command: ['sh','-c','apt update;apt install git -y; curl https://billing.faveohelpdesk.com/download/faveo\?order_number\=order-no\&serial_key\=license-key --output faveo.zip; unzip faveo.zip -d html;chown -R www-data:www-data /html']
        volumeMounts:
        - name: volume-data
          mountPath: /html
      volumes:
      - name: volume-data
        emptyDir: {}
#      - name: cm-
#        configMap:
#          name: faveo-env
#      - name: ca-certificates
#        configMap:
#          name: faveo-ca-certificates
Save and close the file.
Create a namespace for faveo
kubectl create ns faveo
Set the Current Context
kubectl config set-context --current --namespace=faveo
Next, apply your new deployment with the following command:
kubectl apply -f deploy-faveo.yaml
This will create a service and deployment for Faveo helpdesk pods.You can confirm by executing below commands.
kubectl get pods
kubectl get svc
Now that we have the Faveo app running but it is still not accessible externally. For this we need to route the external traffic to faveo-svc service which we created by applying deploy-faveo.yaml to the cluster.
You’ve created deployment of the Faveo helpdesk app with accompanying Service.In the next step, you’ll install the Nginx Ingress Controller which will enable external traffic to route to appropriate backed service.
Step 2: Configuring Nginx Ingress Controller
The Nginx Ingress Controller consists of a Pod and a Service. The Pod runs the Controller, which constantly polls the /ingresses endpoint on the API server of your cluster for updates to available Ingress Resources. The Service is of type LoadBalancer, the cluster will automatically create a Load Balancer on your cloud provider, through which all external traffic will flow to the Controller. The Controller will then route the traffic to appropriate Services, as defined in Ingress Resources.
Only the LoadBalancer Service knows the IP address of the automatically created Load Balancer. To install the Nginx Ingress Controller to your cluster, you’ll first need to add its repository to Helm by running:
helm repo add ingress-nginx https://kubernetes.github.io/ingress-nginx
Update your local Helm chart repository cache:
helm repo update
Create a namespace for Ingress Nginx:
kubectl create ns ingress-nginx
Finally, run the following command to install the Nginx ingress:
helm install ingress-nginx ingress-nginx/ingress-nginx --namespace=ingress-nginx
The above command installs the Nginx Ingress Controller from the stable charts repository and deploys a LoadBalancer. You can watch the LoadBalancer become availble by running.
kubectl --namespace ingress-nginx get services -o wide -w ingress-nginx-controller
At this point once the External IP is availble copy that and set the A record for your domain in your registrar.
You’ve installed the Nginx Ingress maintained by the Kubernetes community. It will route HTTP and HTTPS traffic from the Load Balancer to appropriate back-end Services, configured in Ingress Resources. In the next step, you’ll expose the Faveo Helpdesk app deployments using an Ingress Resource.
Step 3: Securing the Ingress Using SSL
Secure Sockets Layer (SSL) is a standard security technology that creates an encrypted connection between a server and a client. SSL is essential for protecting data transmitted over networks, especially for applications like Faveo, which require HTTPS to function correctly with the latest versions.
Step 4: Faveo Helpdesk Web UI installtion
At this point if the domain name is propagated properly with your server’s IP you can open Faveo in browser just by entering your domainname. You can also check the Propagation update by Visiting this site www.whatsmydns.net.
Now you can install Faveo via GUI Wizard
Step 5: Creating and Configuring ConfigMap for .env
After completing Step 4 you have generated .env file under the faveo root directory. Faveo Helpdesk is laravel based Web Application which solely relies on .env file for functionality. The .env file stores all the sensitive information such as Database credentials, Redis, S3 etc which is later used by the code base.
If you take a look at deploy-faveo.yaml which you created in Step 1, the replicas and part of volume definitions will be commented out. So creating that deploy-faveo.yaml manifest will result in creating only one pod which contains the Faveo code base where we generated the .env file after completing the Step 5.
ConfigMaps allow us to keep configurations separate from application images. Such separation is useful when other alternatives are not a good fit. ConfigMap takes a configuration from a source and mounts it into running containers as a volume. This was we can achieve the configuration of the .env file to be shared across multiple pods and nodes. We are literally achieving persistent volume.
After injecting configmap as volume, we can achieve multiple replicas of pods, auto scalling of pods.
First let’s retrive the content of .env by getting inside the running container. Execute the below command to get the pod name.
kubectl get pod
Copy and replace the pod name from the previous output
kubectl exec -ti your_pod_name -- bash
This is will give you access to the bash shell inside the container. Use cat or nano to get the content of the .env file.
cat .env
or
nano .env
Copy those values and save it somewhere on you machine to be used later.
Now, create a file named configmap.yaml. Add the following lines and place all the content of .env you copied previously under “.env
We need to add the details of redis cluster, space keys like the below.
apiVersion: v1
kind: ConfigMap
metadata:
  name: faveo-env
  namespace: faveo
data:
  .env: |
#    ---- Replace your content here ----
    APP_NAME=Faveo:xxxxxxxxxxxxxxxxxxxxxxxx
    APP_DEBUG=false
    APP_BUGSNAG=true
    APP_URL=https://your_domain_name
    APP_KEY=base64:xxxxxxxxxxxxxxxxxxxxxxxx
    DB_TYPE=mysql
    DB_WRITE_HOST=
    DB_READ_HOST=
    DB_HOST="xxxxxxxxxxxxxxxxxxxxxxxx"
    DB_PORT="xxxxx"
    DB_DATABASE="xxxxx"
    DB_USERNAME="xxxxx"
    DB_PASSWORD="xxxxxxxxxxxxxxxxxxxxxxxx"
    DB_ENGINE=InnoDB
    MAIL_MAILER=smtp
    MAIL_HOST=mailtrap.io
    MAIL_PORT=2525
    MAIL_USERNAME=null
    MAIL_PASSWORD=null
    CACHE_DRIVER=file
    SESSION_DRIVER=file
    SESSION_COOKIE_NAME=faveo_3557
    QUEUE_DRIVER=sync
    FCM_SERVER_KEY=xxxxxxxxxxxxxxxxxxxxxxxx
    FCM_SENDER_ID=xxxxxxxxxxxxxxxxxxxxxxxx
    PROBE_PASS_PHRASE=xxxxxxxxxxxxxxxxxxxxxxxx
    REDIS_DATABASE=0
    BROADCAST_DRIVER=pusher
    LARAVEL_WEBSOCKETS_ENABLED=false
    LARAVEL_WEBSOCKETS_PORT=6001
    LARAVEL_WEBSOCKETS_HOST=127.0.0.1
    LARAVEL_WEBSOCKETS_SCHEME=http
    PUSHER_APP_ID=xxxxxxxxxxxxxxxxxxxxxxxx
    PUSHER_APP_KEY=xxxxxxxxxxxxxxxxxxxxxxxx
    PUSHER_APP_SECRET=xxxxxxxxxxxxxxxxxxxxxxxx
    PUSHER_APP_CLUSTER=mt1
    MIX_PUSHER_APP_KEY="${PUSHER_APP_KEY}"
    MIX_PUSHER_APP_CLUSTER="${PUSHER_APP_CLUSTER}"
    SOCKET_CLIENT_SSL_ENFORCEMENT=false
    LARAVEL_WEBSOCKETS_SSL_LOCAL_CERT=null
    LARAVEL_WEBSOCKETS_SSL_LOCAL_PK=null
    LARAVEL_WEBSOCKETS_SSL_PASSPHRASE=null
    DB_SSL_KEY=
    DB_SSL_CERT=
    DB_SSL_CA=
    DB_SSL_VERIFY_PEER_CERT=false
    SCOUT_DRIVER=database
    MEILISEARCH_HOST=
    MEILISEARCH_KEY=
    ALGOLIA_APP_ID=
    ALGOLIA_SECRET=
    DB_INSTALL=1
    APP_ENV=production
    JWT_SECRET=xxxxxxxxxxxxxxxxxxxxxxxx
#   ---- Add the details of redis cluster, space ----
    AWS_SECRET_ACCESS_KEY=xxxxxxxxxxxxxxxxxxxxxxxx
    AWS_ACCESS_KEY_ID=xxxxxxxxxxxxxxxxxxxxxxxx
    AWS_DEFAULT_REGION=us-east-1
    AWS_BUCKET=xxxxxxxxxxxxxxxxxxxxxxxx
    AWS_ENDPOINT=xxxxxxxxxxxxxxxxxxxxxxxx
    FILESYSTEM_DISK=s3
    REDIS_HOST=xxxxxxxxxxxxxxxxxxxxxxxx
    REDIS_PORT= xxxxx
    REDIS_PASSWORD=xxxxxxxxxxxxxxxxxxxxxxxx
    REDIS_SCHEME=tls
Make sure you replaced all the content of your .env under the “.env |”. Roll it out with kubectl:
kubectl apply -f configmap.yaml
Verfify its running:
kubectl get cm
Now, Let’s modify the deployment to mount configmap inside and also lets increase the number of replicas.
Open deploy-faveo.yaml and uncomment all the faveo-env commented lines. It should now look like this.
---
        - name: cm
          mountPath: /var/www/html/.env
          subPath: .env

---
      - name: cm
        configMap:
          name: faveo-env
Save and close the file. Lets inject this updated definition to kube api:
kubectl apply -f deploy-faveo.yaml
Now the single pod which was running before will be terminating and new 3 pods will be created with updated definition. You can give your desired number of replicas. You can also use Horizontal Pod scaling along with metrics server for autoscaling and descaling. Verify the new pods running by executing the below command:
kubectl get pods
Now that you have created a configmap out of .env and configured it in the deployment which will mount the .env inside all the pods that it creates. The configmap not only will be used by faveo deployment pods but aslo by the supervisor deployment which you will create in next step.
Step 6: Configuring and Deploying Supervisor
Faveo Helpdesk requires certain set of command to be executed to have the Emails sending/receiving, reports generating and recurring. To achieve this we will be spinng a supervisor pod with .env mounted inside it via configmap, which then does the job or us.
Create and open file supervisor.yaml and copy the following lines inside it. Make sure to replace order-no and license-key with your order number and license in the CURL Api.
apiVersion: apps/v1
kind: Deployment
metadata:
  name: supervior-deploy
  namespace: faveo
spec:
  replicas: 1
  selector:
    matchLabels:
      app: supervisor-pods
  template:
    metadata:
      labels:
        app: supervisor-pods
    spec:
      containers:
      - name: faveo-supervisor
        image: ladybird/faveo-k8s:supervisor-8.2.25
        resources:
          limits:
            memory: 1024Mi
            cpu: 1
          requests:
            memory: 900Mi
            cpu: 900m
        volumeMounts:
        - name: volume-data
          mountPath: /var/www/html
        - name: cm
          mountPath: /var/www/html/.env
          subPath: .env
      initContainers:
      - name: fetch
        image: ladybird/fetcher-v9.2.2
       command: ['sh','-c','apt update;apt install git -y; curl https://billing.faveohelpdesk.com/download/faveo\?order_number\=order-no\&serial_key\=license-key --output faveo.zip; unzip faveo.zip -d html;chown -R www-data:www-data /html']
        volumeMounts:
        - name: volume-data
          mountPath: /html
      volumes:
      - name: volume-data
        emptyDir: {}
      - name: cm
        configMap:
          name: faveo-env
Save and close the file.
Next, apply your new deployment with the following command:
kubetctl apply -f supervisor.yaml
This will create a supervisor deployment .You can confirm by executing below commands.
kubectl get pods
Now you should see supervisor pod running along with Faveo Helpdesk pods.
The supervisor pod will use the configuration from .env which is mounted via configmap to perform all the operations.