Installing Meilisearch Driver for Faveo.
![]()
Introduction:
MeiliSearch is an open-source search engine developed in Rust that delivers flexible search and indexing capabilities. It adeptly handles typos, supports full-text search, synonyms, and comes packed with various features, making it an ideal choice for elevating search functionalities in your applications.
1. For Linux Server
Step 1: Install Meilisearch
Once you are logged in into your machine via SSH, ensure your system and its dependencies are up-to-date before proceeding with the installation.
Also make sure curl is installed on the server.
For Debian and Derivatives:
apt update
apt install curl -y
For RHEL and Derivatives:
yum update -y
yum install curl -y
We will use the below script that will carry out the installation process. It will copy a binary of Meilisearch to your machine and enable you to use it immediately.
curl -L https://install.meilisearch.com | sh
Give the binary execute permission using:
chmod +x meilisearch
Meilisearch is finally installed and ready to use. To make it accessible from everywhere in your system, move the binary file into your system binaries folder:
mv ./meilisearch /usr/local/bin/
Step 2: Create System User
Running applications as root can introduce security flaws in your system. To prevent that from happening, create a dedicated system user for running Meilisearch:
useradd -d /var/lib/meilisearch -b /bin/false -m -r meilisearch
Step 3: Create a Configuration File
Download default config to /etc:
curl https://raw.githubusercontent.com/meilisearch/meilisearch/latest/config.toml > /etc/meilisearch.toml
Update the following lines so Meilisearch stores its data in the home folder of your newly created user:
nano /etc/meilisearch.toml
env = "production"
master_key = "YOUR_MASTER_KEY_VALUE"
db_path = "/var/lib/meilisearch/data"
dump_dir = "/var/lib/meilisearch/dumps"
snapshot_dir = "/var/lib/meilisearch/snapshots"
NOTE: Remember to choose a safe and random key like master_key = lc3CEU9zI6G1ZfPZkW2SMwWXQj_hDwhZh-pa3Nh-qRw
Finally, create the directories you added to the configuration file and set proper privileges:
mkdir /var/lib/meilisearch/data /var/lib/meilisearch/dumps /var/lib/meilisearch/snapshots

chown -R meilisearch:meilisearch /var/lib/meilisearch

chmod 750 /var/lib/meilisearch
Step 4: Run Meilisearch as a service
We will use a very simple service file that will run Meilisearch on port 7700.
Run this command to create a service file:
cat << EOF > /etc/systemd/system/meilisearch.service
[Unit]
Description=Meilisearch
After=systemd-user-sessions.service

[Service]
Type=simple
WorkingDirectory=/var/lib/meilisearch
ExecStart=/usr/local/bin/meilisearch --config-file-path /etc/meilisearch.toml
User=meilisearch
Group=meilisearch

[Install]
WantedBy=multi-user.target
EOF
The service file you just built is all you need for creating your service. Now you must enable it to tell the operating system that we want it to run Meilisearch at every boot. You can then start the service to make it run immediately. Ensure everything is working smoothly by checking the service status.
systemctl enable meilisearch

systemctl start meilisearch

systemctl status meilisearch
At this point, Meilisearch is installed and running on your Linux Server.
2. For Windows Server
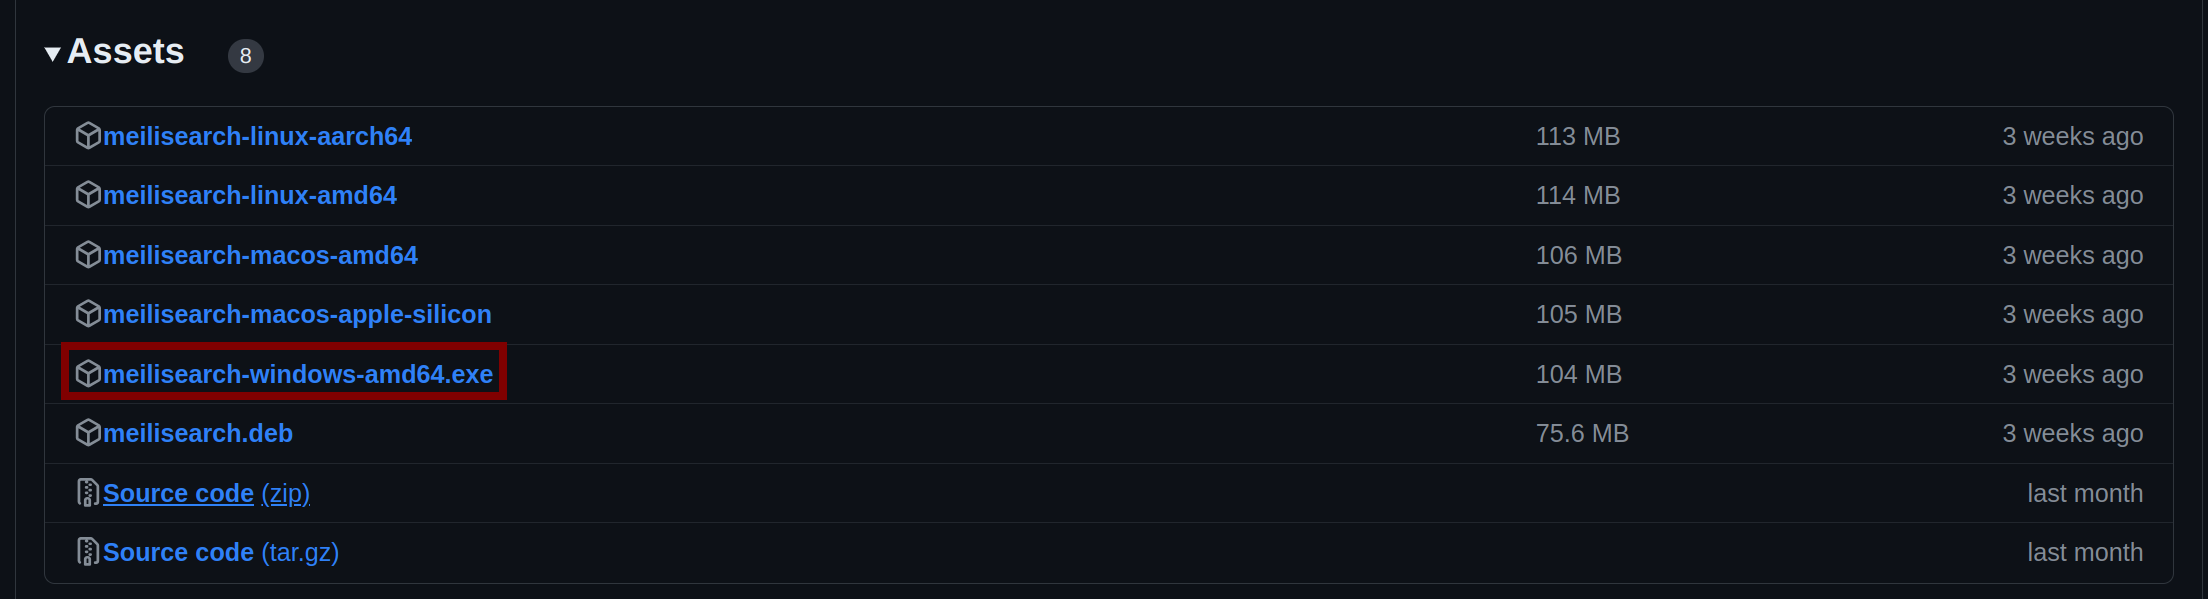
Step 1: Download Meilisearch Executable:
Visit the Meilisearch Releases page.
Download the Windows executable for Meilisearch.
Copy the downloaded executable to C:\MeiliSearch.
Step 2: Download WinSW (Windows Service Wrapper):
Go to the WinSW Releases page.
Download the latest WinSW executable and rename it to MeilisearchService.exe.
Place MeilisearchService.exe in the C:\MeiliSearch directory.
Step 3: Create WinSW Configuration File:
In the C:\MeiliSearch directory, create a file named winsw.xml. Add the following content to MeilisearchService.xml:
<service>
  <id>Meilisearch</id>
  <name>Meilisearch</name>
  <description>This service runs Meilisearch.</description>

  <prestart>
    <executable>C:\MeiliSearch\script.bat</executable>
    <logpath>C:\MeiliSearch\logs</logpath>
    <log mode="roll-by-size">
      <sizeThreshold>5120</sizeThreshold>
      <keepFiles>2</keepFiles>
    </log>
  </prestart>

  <onfailure action="restart" />
</service>
Step 4: Create Script to Run Meilisearch:
Create a file named script.bat in the C:\MeiliSearch directory.
Add the following content to script.bat:
@echo off
setlocal

for /f "tokens=2 delims==" %%a in ('findstr "MASTER_KEY" "C:\MeiliSearch\meili-config.txt"') do (
    set MASTER_KEY=%%a
)

if "%MASTER_KEY%"=="" (
    echo "Error: MASTER_KEY not set in meili-config.txt."
    exit /b 1
)

C:\MeiliSearch\meilisearch-windows-amd64.exe --env production --master-key %MASTER_KEY% --db-path "C:\MeiliSearch\data" --dump-dir "C:\MeiliSearch\dumps" --snapshot-dir "C:\MeiliSearch\snapshots"
Step 5: Create Configuration File for the Master Key:
Create a file named meili-config.txt in the C:\MeiliSearch directory.
Add the following line, replacing your-master-key with a secure master key:
MASTER_KEY=your-master-key
NOTE: Remember to choose a safe and random key like MASTER_KEY=lc3CEU9zI6G1ZfPZkW2SMwWXQj_hDwhZh-pa3Nh-qRw
Step 6: Install and Manage the Windows Service
- Open Command Prompt in Administrator Mode:
- Press Windows Key, type cmd, right-click on Command Prompt, and select Run as administrator.
- Navigate to the directory where
MeilisearchService.exeis located:
cd C:\MeiliSearch
- Install the Service:
MeilisearchService.exe install - Start the Service:
MeilisearchService.exe start - Stop the Service:
MeilisearchService.exe stop - Uninstall the Service:
MeilisearchService.exe uninstall - Check the Service Status:
MeilisearchService.exe status
Step 7: Verify Meilisearch is Running
Once the service is started, you can verify that Meilisearch is running by visiting:
http://localhost:7700
If everything is configured correctly, you should see the Meilisearch dashboard.
Step 8: Changing the Master Key
To change the master key:
- Update the
meili-config.txtfile with the new master key:MASTER_KEY=new-master-key - Restart the Meilisearch service to apply the changes:
MeilisearchService.exe restart
You have successfully set up Meilisearch as a Windows service with the ability to change the master key using the meili-config.txt file. This setup allows for easy management and ensures that Meilisearch runs smoothly on your Windows server.