Installing Faveo Helpdesk Freelancer, paid and Enterprise on Windows
Faveo can run on [Windows Server](https://www.microsoft.com/en-au/windows-server).
- [Installation steps:](#installation-steps)
- [1.Faveo depends on the following:](#1faveo-depends-on-the-following)
- [ 2. Faveo Installation ](#-2-faveo-installation-)
- [ 3. Configure Faveo in IIS Manager. ](#-3-configure-faveo-in-iis-manager-)
- [ 4. Setting up the Database. ](#-4-setting-up-the-database-)
- [ 5. Configure IIS webserver ](#-5-configure-iis-webserver-)
- [6. Configure Task Scheduler ](#6-configure-task-scheduler-)
- [7. SSL Installation ](#7-ssl-installation-)
- [ 8. Install Faveo ](#-8-install-faveo-)
- [9. Final step](#9-final-step)
## Installation steps:
### 1.Faveo depends on the following:
- **a. IIS**
- **b. PHP 7.3+**
- **c. MariaDB 10.3+**
- **d. Install Ioncube Loader**
- **e. Configure the php.ini file.**
- **f. SSL: Trusted CA Signed or Slef-Signed SSL.**
1.a. Install IIS server
To install IIS Server open Server Manager and locate the Manage button on the top right corner click on it and select -> Add Roles and Features
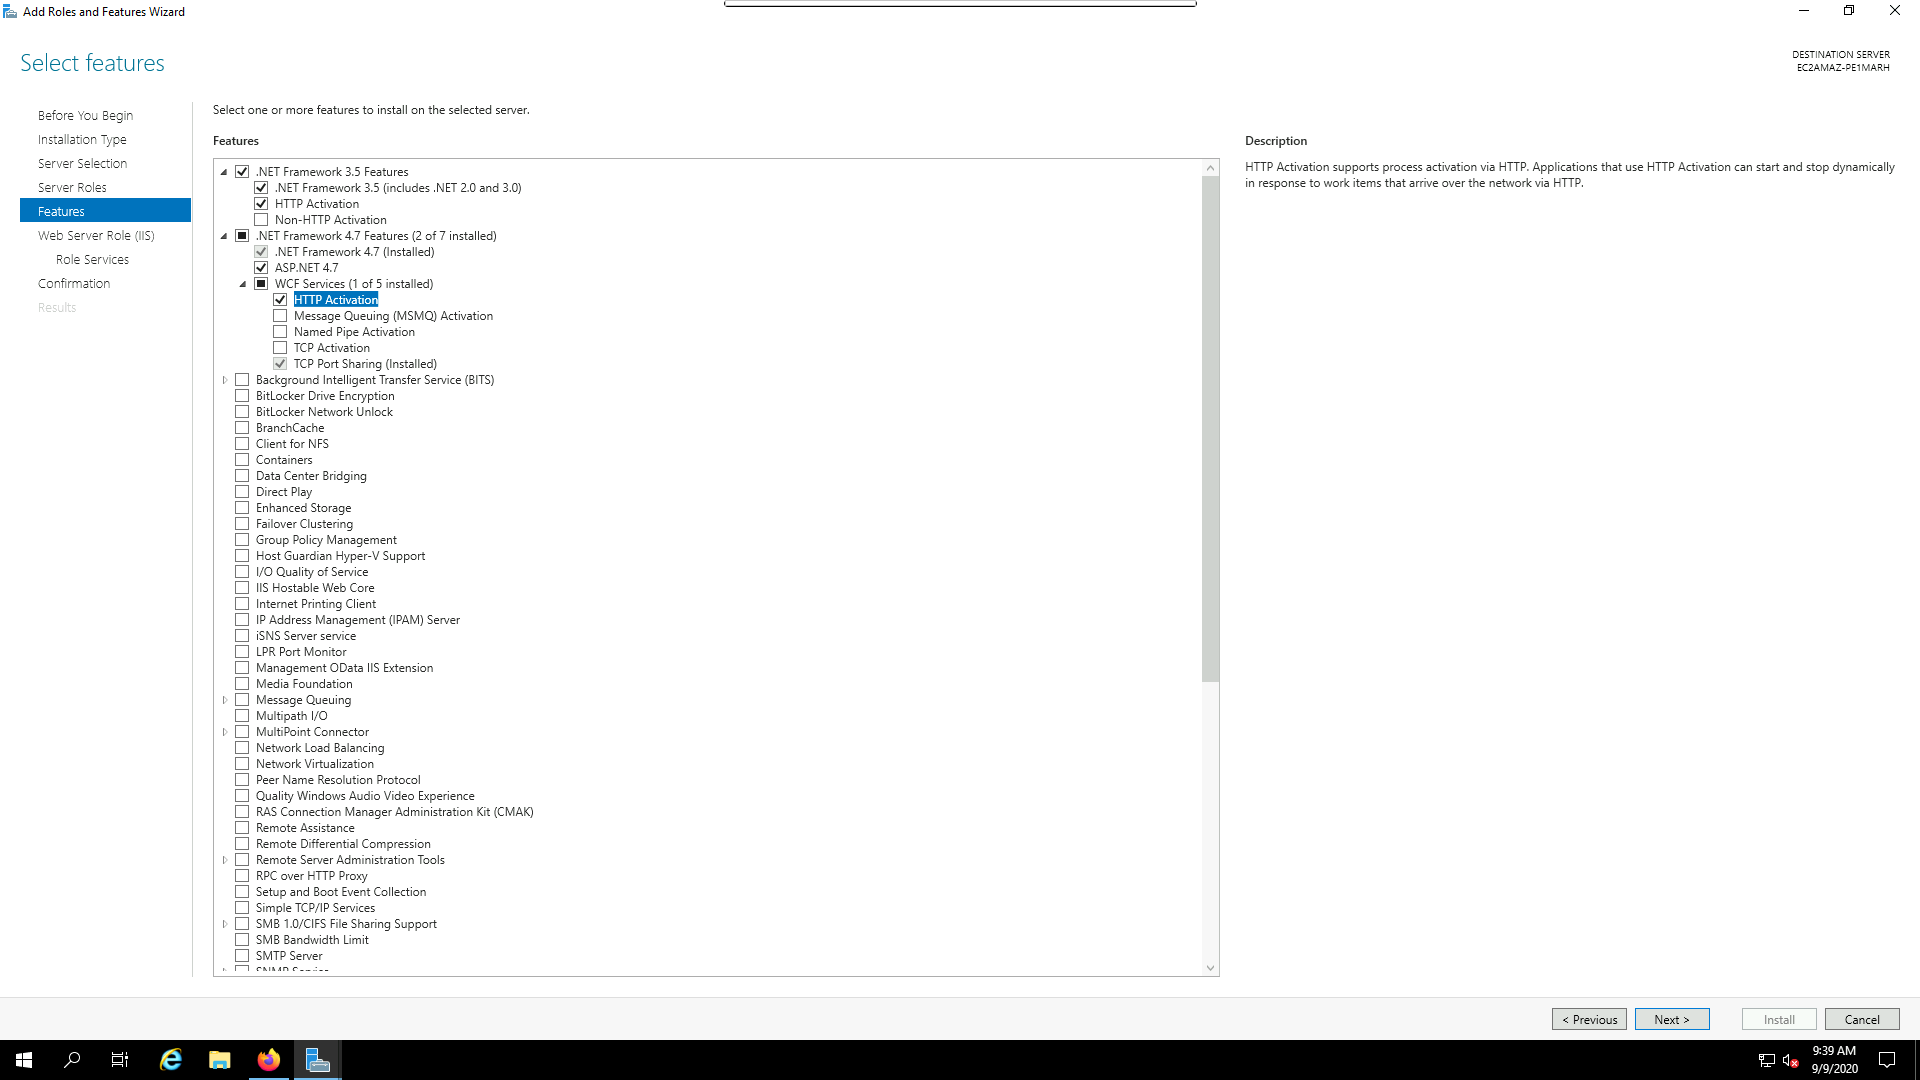
- A wizard will open displaying the overview, click on next, and under “Installation Type” select Role-based and Feature-based installation and select next. Leave the default in “Server Selection” and click next. Now under “Server Roles” search and enable the checkbox for “Web Server IIS” click on the “Add Features'' window and proceed by clicking next.
- In the “Features” section locate the .NET Framework 3.5 and .NET Framework 4.7 select the packages as shown in the below image.
- Click next -> next -> thrice to confirm the settings and finally click on Install. It will get the IIS installed on the server. To verify the installation, you can type the following URL in the browser
```
http://localhost/
```
1.b. Install PHP-7.3
- To make the installation easy and smooth, we will be using the Web Platform Installer. It is a special tool provided by Microsoft for quick installation of most of our requirements. You can download it from the following link and install it.
[Click here to download Web platform installer](https://www.microsoft.com/web/downloads/platform.aspx)
- After installation locate “Tools” in the Server Manager Dashboard on the top right corner click on it and select “Internet Information Services (IIS) Manager”
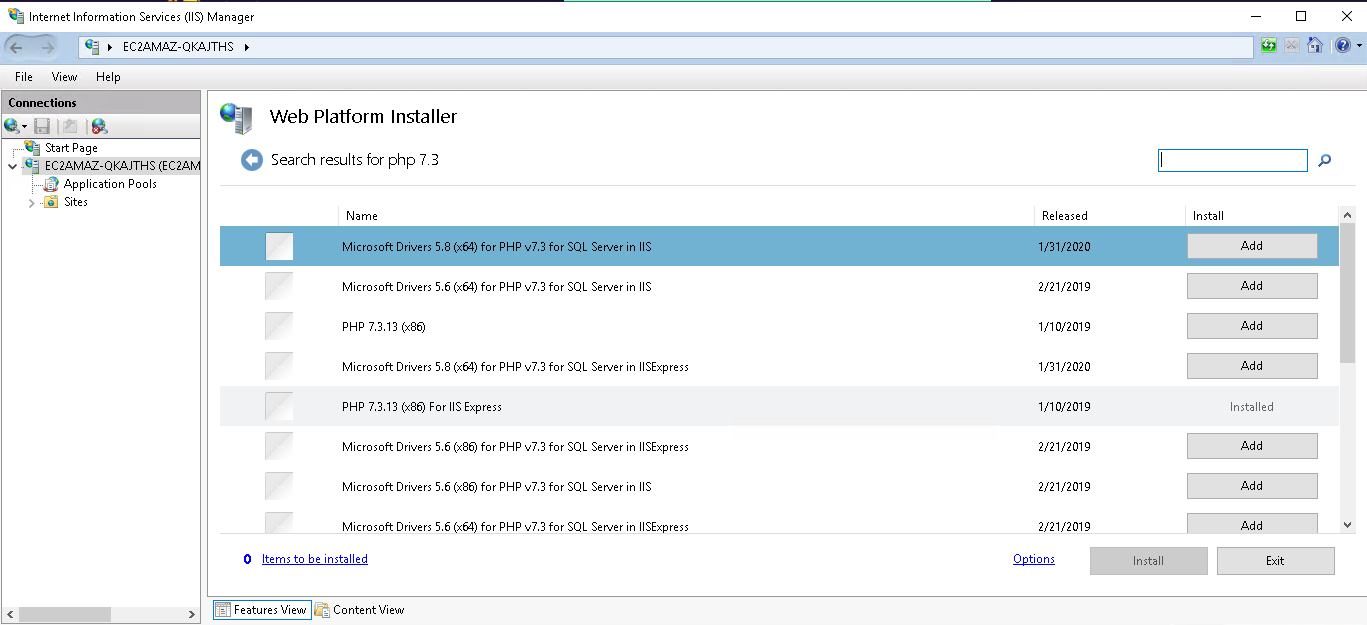
- Now in the Left Pane of the IIS Manager window select your server then you will find the “Web Platform Installer” if it is installed from the previous step.
- Open the Web Platform Installer and search for the following Extensions to add.
**PHP 7.3**
**URLRewrite**
**MySQL Connector/Net**
- “Click on install and accept the license agreement”, the installation should take a few minutes to complete.
- Download and install PHP Manager from the below link
- [Click here to download PHP Manager](https://www.faveohelpdesk.com/user-manual/windows_installation/phpmanager.zip)
- Extract the ZIP file and install PHP Manager.
1.c. Install MariaDB-10.3
- Download and install MariaDB-10.3 from the official MariaDB website. [Click here to download mariaDB](https://downloads.mariadb.org/mariadb/)
- Execute the installer to perform the required installation steps and set the root password.
1.d. Copy and Enable cacert.pem file in php.ini.
- This is required to avoid the “cURL 60 error” which is one of the Probes that Faveo checks. In other words, this is a necessary step to run Faveo on IIS Server.
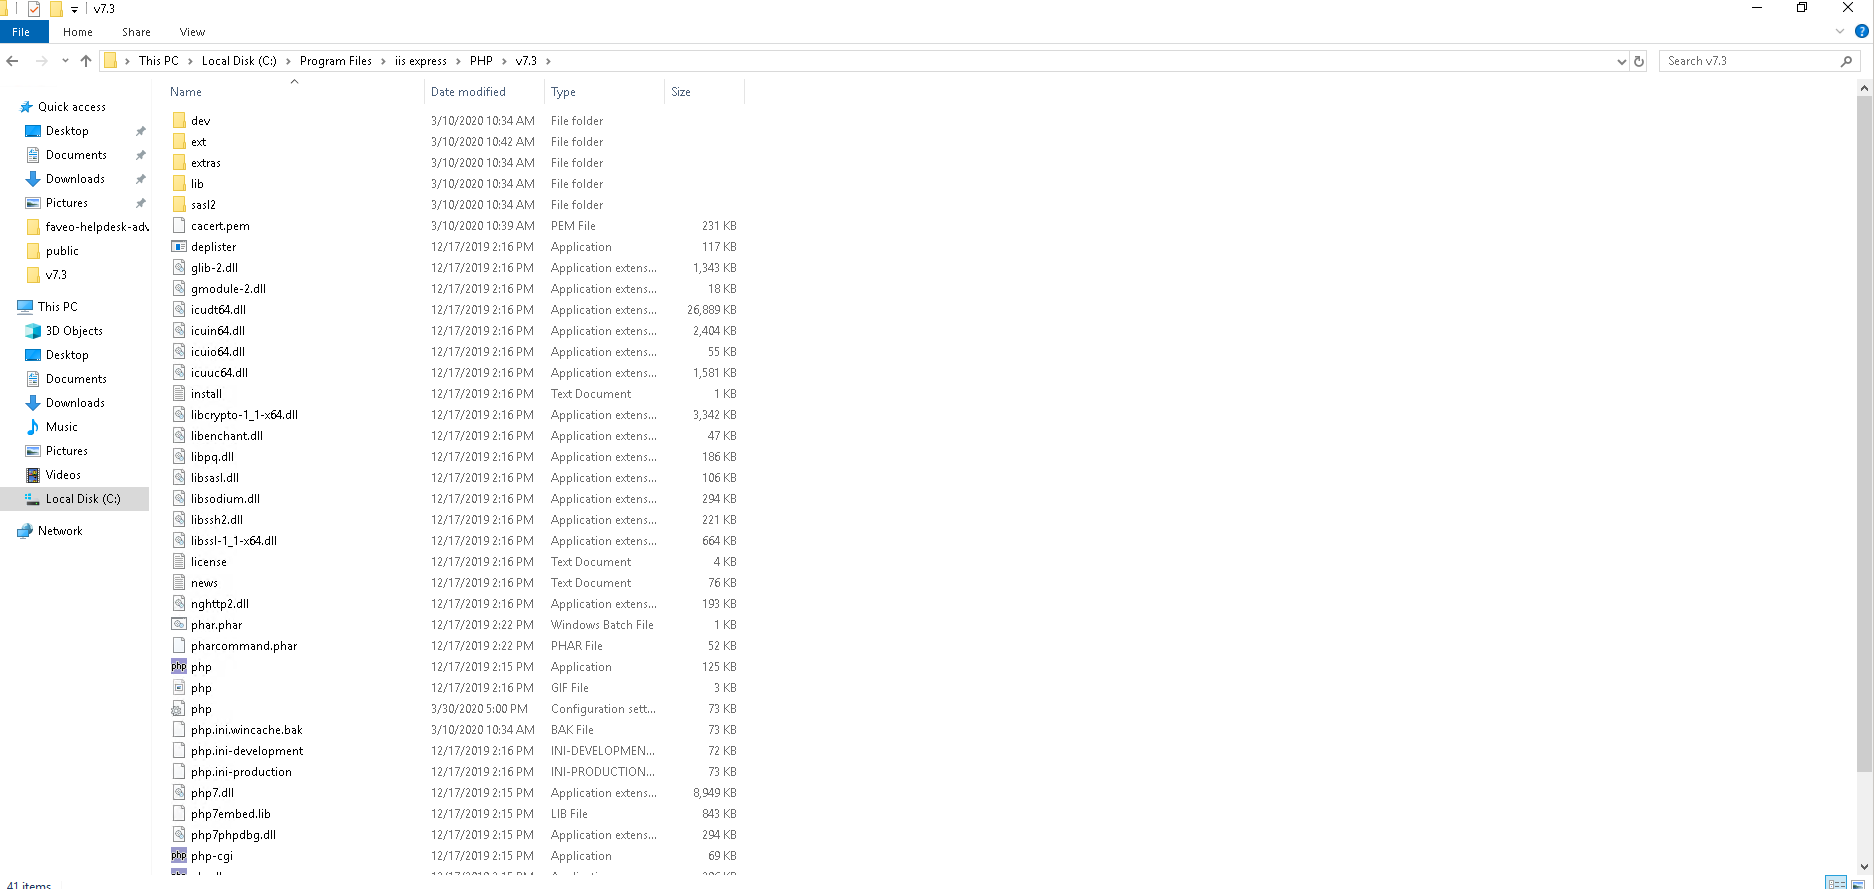
1.e.(a) Download and Extract the “cacert.pem” file and copy it to the PHP root directory.
- Usually found in the below mentioned location. If it is different in your server copy it to that location.
```
(C:\Program Files\PHP\v7.3)
```
[Click here to download cacaert.pem file](https://www.faveohelpdesk.com/user-manual/windows_installation/pem_file.zip)
1.e.(b) Edit the php.ini file which is found inside the PHP root directory.
- Uncomment and add the location of cacert.pem to “curl.cainfo”.
```
curl.cainfo = "C:\Program Files\PHP\v7.3\cacert.pem"
```
- Note: The location of PHP 7.3 in the IIS Server is the following. You will need this location to add extensions to your websites.
1.f. Install Ioncube Loader 1.f.(a) Download the Ioncube loader from the below link and extract.
[Click here to download IonCube](https://downloads.ioncube.com/loader_downloads/ioncube_loaders_win_nonts_vc15_x86-64.zip)
1.f.(b) Copy the “ioncube_loader_win_7.3.dll” from extracted Ioncube folder and paste it in the PHP extension directory.
- which can be found here:
```
"C:\Program Files\PHP\v7.3\ext\"
```
1.f.(c) Copy the “loader-wizard.php” from the extracted Ioncube folder and paste it into the IIS Root Directory.
- which can be found here:
```
"C:\inetpub\wwwroot\"
```
1.g. Configure the php.ini file.
- Add the below line in your php.ini file to enable Ioncube.
```
zend_extension = "C:\Program Files\PHP\v7.3\ext\ioncube_loader_win_7.3.dll"
```
- Make sure the below lines are present in the php.ini file if not add or uncomment the respective lines.
```
extension=php_mysqli.dll
extension=php_pdo_mysql.dll
extension=php_ldap.dll
extension=php_fileinfo.dll
```
- Run the below URL to verify the ionCube Installation. Note: If you didn’t get the below output try restarting the IIS Server.
```
localhost\loader-wizard.php
```
### 2. Faveo Installation
- Once all the above software is installed.
2.a. Upload Faveo
- Please download the Faveo Helpdesk from https://billing.faveohelpdesk.com and upload it to the below directory.
```
c:\inetpub\wwwroot\
```
2.b. Give Permissions to the Faveo folder
- We need to give full write permission to “IIS_IUSRS” and “Users” for the wwwroot folder.
```
c:\inetpub\wwwroot\
```
### 3. Configure Faveo in IIS Manager.
- Open IIS Manager and in the left pane,
- Explore till you find default_website and select it.
- Then in the right pane, you will see the “Basic Settings” option click on it.
- Set the Physical Path value to:
```
"%SystemDrive%\inetpub\wwwroot\public"
```
3.a Configure web.config file for IIS
- Open notepad and copy the below and then save the file under the below path as web.config
```
c:\inetpub\wwwroot\public
```
- Make sure while saving you select all file types otherwise you will end up having the file as web.config.txt which is not acceptable because the file type should be “CONFIG File”.
- Below is the code which should be copied in the file.
```
```
### 4. Setting up the Database.
Open MariaDB 10.3 Command Line Client and run the below command.
- Create a database called ‘faveo’.
```sql
CREATE DATABASE faveo;
```
- Create a user called ‘faveo’ and its password ‘strong password’.
```sql
CREATE USER 'faveo'@'localhost' IDENTIFIED BY 'strongpassword';
```
- We have to authorize the new user on the faveo DB so that he is allowed to change the database.
```sql
GRANT ALL ON faveo.* TO 'faveo'@'localhost';
```
- And finally, we apply the changes and exit the database.
```sql
FLUSH PRIVILEGES;
exit
```
### 5. Configure IIS webserver
By default, IIS configures PHP only to accept GET, POST, and HEAD request types. Since Faveo makes use of other requests types (such as DELETE and PUT), you must manually change the PHP handler to allow them.
5.a Open IIS Manager
- Open the Start menu and type “IIS” into the find box. You should see an application called “Internet Information Services (IIS) Manager”.
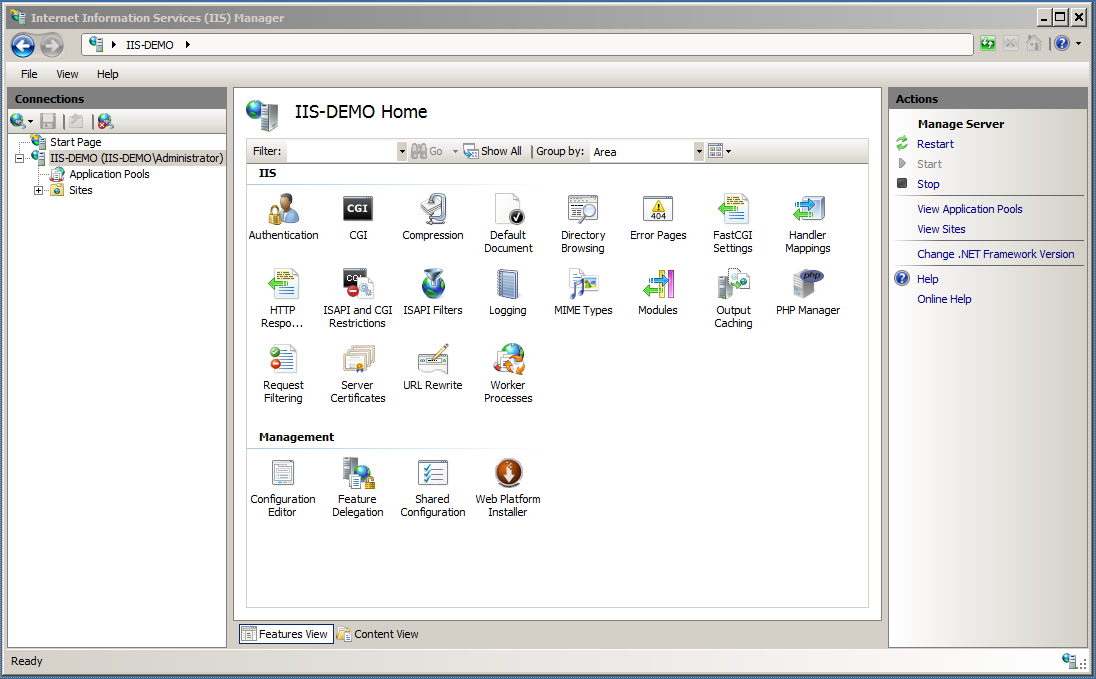
5.b Select your computer in the "Connections" pane
- On the left, there is a “Connections” pane. You should see your computer listed here. Click on your computer name which should load the dashboard with a handful of icons.
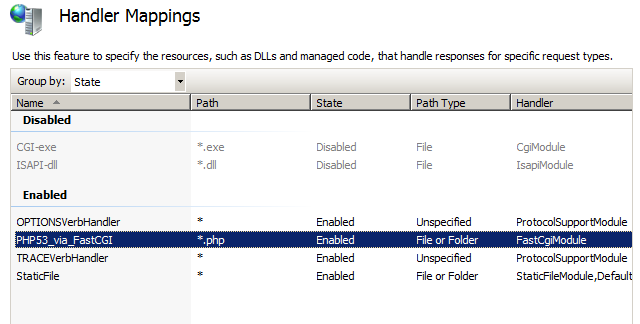
5.c Open PHP Handler Mapping
- Double-click on the Handler Mappings icon to bring up the Handler Mappings screen.
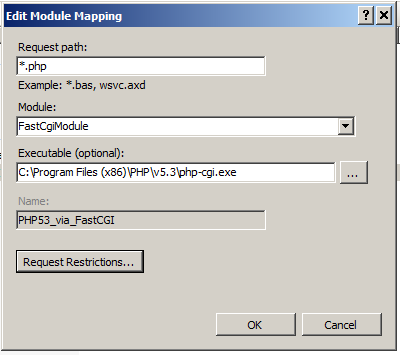
- Then double-click on the handler for PHP files to bring up the “Edit Module Mapping” window:
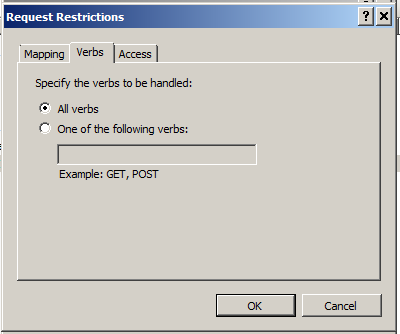
5.c Edit Verbs
- Click on the “Request Restrictions” button, then switch to the [Verbs] tab. Switch the radio button to “All Verbs”, then click“OK” to close the window, then “OK” again to close the other.
- Note: You may be prompted with an alert to “fix” the path to the PHP executable. If so, just put double-quotation marks around the path that already exists in the “Executable” box and it will save successfully.
5.e Setting up Bindings
- To Open the Faveo on your domain, you must set the binding.
- Go to the Bindings option on the right pane, select HTTP and edit the hostname to your concerned Domain.
- Now you can open the browser and enter the IP or Domain Name to open Faveo. To test the successful configuration perform some delete operations in Faveo if the Delete operation fails then the above steps are not sufficient at this point you may need to perform the below steps too
**Disable WebDav (Optional)**
- Perform this step only if you have a problem with the delete option in Faveo even after following the previous steps.
- To remove WebDav,
- Go to Control Panel -> Uninstall Program -> Turn Windows features on or off -> IIS -> World Wide Web Services -> Common HTTP feature -> WebDAV Publishing.
### 6. Configure Task Scheduler
- To open Task scheduler press ctrl + R and Type “taskschd.msc”.
- To Setup Schedule task for Faveo. Open Task Scheduler on the server and follow these steps.
- On the Right pane of the Task scheduler select “create basic task” enter a name for the task and click Next.
- Under Trigger, section select daily and click next and leave the default values in daily section and proceed next.
- Now under the Action section select start a program and click next and in Start a program copy the below value into the program/script field.
```
C:\Windows\System32\cmd.exe
```
- Add the following value to the Argument :
```
c:\inetpub\wwwroot\faveo\artisan" schedule:run #this is for faveo incoming mail,esacalation, faveo update check.
c:\inetpub\wwwroot\faveo\artisan queue:listen database --queue=reports #this is for the reports.
c:\inetpub\wwwroot\faveo\artisan" queue:listen database --queue=recurring #this is for recurring.
c:\inetpub\wwwroot\faveo\artisan queue:work database #this is for outgoing mail.
```
- The above commands will be the task scheduler commands.
- Finally under the Finish section select the checkbox to open the properties window after finish and click the finish button.
- In the properties, window selects the Triggers tab, click on edit and select the checkbox for “Repeat task every” set values to run every 5 minutes indefinitely and click on OK.
### 7. SSL Installation
Secure Sockets Layer (SSL) is a standard security technology for establishing an encrypted link between a server and a client. Let’s Encrypt is a free, automated, and open certificate authority.
Faveo Requires HTTPS so the SSL is a must to work with the latest versions of faveo, so for the internal network and if there is no domain for free you can use the Self-Signed-SSL.
[Let’s Encrypt SSL installation documentation](/docs/installation/providers/enterprise/windows-iis-ssl)
[Self-Signed SSL installation documentation](/docs/installation/providers/enterprise/self-signed-ssl-windows)
### 8. Install Faveo
Now you can install Faveo via [GUI](/docs/installation/installer/gui) Wizard or [CLI](/docs/installation/installer/cli)
### 9. Final step
The final step is to have fun with your newly created instance, which should be up and running to http://localhost or the domain you have configured Faveo with.
 - Click next -> next -> thrice to confirm the settings and finally click on Install. It will get the IIS installed on the server. To verify the installation, you can type the following URL in the browser
```
http://localhost/
```
1.b. Install PHP-7.3
- To make the installation easy and smooth, we will be using the Web Platform Installer. It is a special tool provided by Microsoft for quick installation of most of our requirements. You can download it from the following link and install it.
[Click here to download Web platform installer](https://www.microsoft.com/web/downloads/platform.aspx)
- After installation locate “Tools” in the Server Manager Dashboard on the top right corner click on it and select “Internet Information Services (IIS) Manager”
- Now in the Left Pane of the IIS Manager window select your server then you will find the “Web Platform Installer” if it is installed from the previous step.
- Open the Web Platform Installer and search for the following Extensions to add.
**PHP 7.3**
**URLRewrite**
**MySQL Connector/Net**
- Click next -> next -> thrice to confirm the settings and finally click on Install. It will get the IIS installed on the server. To verify the installation, you can type the following URL in the browser
```
http://localhost/
```
1.b. Install PHP-7.3
- To make the installation easy and smooth, we will be using the Web Platform Installer. It is a special tool provided by Microsoft for quick installation of most of our requirements. You can download it from the following link and install it.
[Click here to download Web platform installer](https://www.microsoft.com/web/downloads/platform.aspx)
- After installation locate “Tools” in the Server Manager Dashboard on the top right corner click on it and select “Internet Information Services (IIS) Manager”
- Now in the Left Pane of the IIS Manager window select your server then you will find the “Web Platform Installer” if it is installed from the previous step.
- Open the Web Platform Installer and search for the following Extensions to add.
**PHP 7.3**
**URLRewrite**
**MySQL Connector/Net**
 - “Click on install and accept the license agreement”, the installation should take a few minutes to complete.
- Download and install PHP Manager from the below link
- [Click here to download PHP Manager](https://www.faveohelpdesk.com/user-manual/windows_installation/phpmanager.zip)
- Extract the ZIP file and install PHP Manager.
1.c. Install MariaDB-10.3
- Download and install MariaDB-10.3 from the official MariaDB website. [Click here to download mariaDB](https://downloads.mariadb.org/mariadb/)
- Execute the installer to perform the required installation steps and set the root password.
1.d. Copy and Enable cacert.pem file in php.ini.
- This is required to avoid the “cURL 60 error” which is one of the Probes that Faveo checks. In other words, this is a necessary step to run Faveo on IIS Server.
1.e.(a) Download and Extract the “cacert.pem” file and copy it to the PHP root directory.
- Usually found in the below mentioned location. If it is different in your server copy it to that location.
```
(C:\Program Files\PHP\v7.3)
```
[Click here to download cacaert.pem file](https://www.faveohelpdesk.com/user-manual/windows_installation/pem_file.zip)
1.e.(b) Edit the php.ini file which is found inside the PHP root directory.
- Uncomment and add the location of cacert.pem to “curl.cainfo”.
```
curl.cainfo = "C:\Program Files\PHP\v7.3\cacert.pem"
```
- Note: The location of PHP 7.3 in the IIS Server is the following. You will need this location to add extensions to your websites.
- “Click on install and accept the license agreement”, the installation should take a few minutes to complete.
- Download and install PHP Manager from the below link
- [Click here to download PHP Manager](https://www.faveohelpdesk.com/user-manual/windows_installation/phpmanager.zip)
- Extract the ZIP file and install PHP Manager.
1.c. Install MariaDB-10.3
- Download and install MariaDB-10.3 from the official MariaDB website. [Click here to download mariaDB](https://downloads.mariadb.org/mariadb/)
- Execute the installer to perform the required installation steps and set the root password.
1.d. Copy and Enable cacert.pem file in php.ini.
- This is required to avoid the “cURL 60 error” which is one of the Probes that Faveo checks. In other words, this is a necessary step to run Faveo on IIS Server.
1.e.(a) Download and Extract the “cacert.pem” file and copy it to the PHP root directory.
- Usually found in the below mentioned location. If it is different in your server copy it to that location.
```
(C:\Program Files\PHP\v7.3)
```
[Click here to download cacaert.pem file](https://www.faveohelpdesk.com/user-manual/windows_installation/pem_file.zip)
1.e.(b) Edit the php.ini file which is found inside the PHP root directory.
- Uncomment and add the location of cacert.pem to “curl.cainfo”.
```
curl.cainfo = "C:\Program Files\PHP\v7.3\cacert.pem"
```
- Note: The location of PHP 7.3 in the IIS Server is the following. You will need this location to add extensions to your websites.
 1.f. Install Ioncube Loader
1.f.(a) Download the Ioncube loader from the below link and extract.
[Click here to download IonCube](https://downloads.ioncube.com/loader_downloads/ioncube_loaders_win_nonts_vc15_x86-64.zip)
1.f.(b) Copy the “ioncube_loader_win_7.3.dll” from extracted Ioncube folder and paste it in the PHP extension directory.
- which can be found here:
```
"C:\Program Files\PHP\v7.3\ext\"
```
1.f. Install Ioncube Loader
1.f.(a) Download the Ioncube loader from the below link and extract.
[Click here to download IonCube](https://downloads.ioncube.com/loader_downloads/ioncube_loaders_win_nonts_vc15_x86-64.zip)
1.f.(b) Copy the “ioncube_loader_win_7.3.dll” from extracted Ioncube folder and paste it in the PHP extension directory.
- which can be found here:
```
"C:\Program Files\PHP\v7.3\ext\"
```
 1.f.(c) Copy the “loader-wizard.php” from the extracted Ioncube folder and paste it into the IIS Root Directory.
- which can be found here:
```
"C:\inetpub\wwwroot\"
```
1.f.(c) Copy the “loader-wizard.php” from the extracted Ioncube folder and paste it into the IIS Root Directory.
- which can be found here:
```
"C:\inetpub\wwwroot\"
```
 1.g. Configure the php.ini file.
- Add the below line in your php.ini file to enable Ioncube.
```
zend_extension = "C:\Program Files\PHP\v7.3\ext\ioncube_loader_win_7.3.dll"
```
- Make sure the below lines are present in the php.ini file if not add or uncomment the respective lines.
```
extension=php_mysqli.dll
extension=php_pdo_mysql.dll
extension=php_ldap.dll
extension=php_fileinfo.dll
```
- Run the below URL to verify the ionCube Installation. Note: If you didn’t get the below output try restarting the IIS Server.
```
localhost\loader-wizard.php
```
1.g. Configure the php.ini file.
- Add the below line in your php.ini file to enable Ioncube.
```
zend_extension = "C:\Program Files\PHP\v7.3\ext\ioncube_loader_win_7.3.dll"
```
- Make sure the below lines are present in the php.ini file if not add or uncomment the respective lines.
```
extension=php_mysqli.dll
extension=php_pdo_mysql.dll
extension=php_ldap.dll
extension=php_fileinfo.dll
```
- Run the below URL to verify the ionCube Installation. Note: If you didn’t get the below output try restarting the IIS Server.
```
localhost\loader-wizard.php
```
 5.c Open PHP Handler Mapping
- Double-click on the Handler Mappings icon to bring up the Handler Mappings screen.
5.c Open PHP Handler Mapping
- Double-click on the Handler Mappings icon to bring up the Handler Mappings screen.
 - Then double-click on the handler for PHP files to bring up the “Edit Module Mapping” window:
 5.c Edit Verbs
- Click on the “Request Restrictions” button, then switch to the [Verbs] tab. Switch the radio button to “All Verbs”, then click“OK” to close the window, then “OK” again to close the other.
5.c Edit Verbs
- Click on the “Request Restrictions” button, then switch to the [Verbs] tab. Switch the radio button to “All Verbs”, then click“OK” to close the window, then “OK” again to close the other.
 - Note: You may be prompted with an alert to “fix” the path to the PHP executable. If so, just put double-quotation marks around the path that already exists in the “Executable” box and it will save successfully.
5.e Setting up Bindings
- To Open the Faveo on your domain, you must set the binding.
- Go to the Bindings option on the right pane, select HTTP and edit the hostname to your concerned Domain.
- Now you can open the browser and enter the IP or Domain Name to open Faveo. To test the successful configuration perform some delete operations in Faveo if the Delete operation fails then the above steps are not sufficient at this point you may need to perform the below steps too
**Disable WebDav (Optional)**
- Perform this step only if you have a problem with the delete option in Faveo even after following the previous steps.
- To remove WebDav,
- Go to Control Panel -> Uninstall Program -> Turn Windows features on or off -> IIS -> World Wide Web Services -> Common HTTP feature -> WebDAV Publishing.
### 6. Configure Task Scheduler
- To open Task scheduler press ctrl + R and Type “taskschd.msc”.
- To Setup Schedule task for Faveo. Open Task Scheduler on the server and follow these steps.
- On the Right pane of the Task scheduler select “create basic task” enter a name for the task and click Next.
- Under Trigger, section select daily and click next and leave the default values in daily section and proceed next.
- Now under the Action section select start a program and click next and in Start a program copy the below value into the program/script field.
```
C:\Windows\System32\cmd.exe
```
- Add the following value to the Argument :
```
c:\inetpub\wwwroot\faveo\artisan" schedule:run #this is for faveo incoming mail,esacalation, faveo update check.
c:\inetpub\wwwroot\faveo\artisan queue:listen database --queue=reports #this is for the reports.
c:\inetpub\wwwroot\faveo\artisan" queue:listen database --queue=recurring #this is for recurring.
c:\inetpub\wwwroot\faveo\artisan queue:work database #this is for outgoing mail.
```
- The above commands will be the task scheduler commands.
- Finally under the Finish section select the checkbox to open the properties window after finish and click the finish button.
- In the properties, window selects the Triggers tab, click on edit and select the checkbox for “Repeat task every” set values to run every 5 minutes indefinitely and click on OK.
### 7. SSL Installation
Secure Sockets Layer (SSL) is a standard security technology for establishing an encrypted link between a server and a client. Let’s Encrypt is a free, automated, and open certificate authority.
Faveo Requires HTTPS so the SSL is a must to work with the latest versions of faveo, so for the internal network and if there is no domain for free you can use the Self-Signed-SSL.
[Let’s Encrypt SSL installation documentation](/docs/installation/providers/enterprise/windows-iis-ssl)
[Self-Signed SSL installation documentation](/docs/installation/providers/enterprise/self-signed-ssl-windows)
### 8. Install Faveo
Now you can install Faveo via [GUI](/docs/installation/installer/gui) Wizard or [CLI](/docs/installation/installer/cli)
### 9. Final step
The final step is to have fun with your newly created instance, which should be up and running to http://localhost or the domain you have configured Faveo with.
- Note: You may be prompted with an alert to “fix” the path to the PHP executable. If so, just put double-quotation marks around the path that already exists in the “Executable” box and it will save successfully.
5.e Setting up Bindings
- To Open the Faveo on your domain, you must set the binding.
- Go to the Bindings option on the right pane, select HTTP and edit the hostname to your concerned Domain.
- Now you can open the browser and enter the IP or Domain Name to open Faveo. To test the successful configuration perform some delete operations in Faveo if the Delete operation fails then the above steps are not sufficient at this point you may need to perform the below steps too
**Disable WebDav (Optional)**
- Perform this step only if you have a problem with the delete option in Faveo even after following the previous steps.
- To remove WebDav,
- Go to Control Panel -> Uninstall Program -> Turn Windows features on or off -> IIS -> World Wide Web Services -> Common HTTP feature -> WebDAV Publishing.
### 6. Configure Task Scheduler
- To open Task scheduler press ctrl + R and Type “taskschd.msc”.
- To Setup Schedule task for Faveo. Open Task Scheduler on the server and follow these steps.
- On the Right pane of the Task scheduler select “create basic task” enter a name for the task and click Next.
- Under Trigger, section select daily and click next and leave the default values in daily section and proceed next.
- Now under the Action section select start a program and click next and in Start a program copy the below value into the program/script field.
```
C:\Windows\System32\cmd.exe
```
- Add the following value to the Argument :
```
c:\inetpub\wwwroot\faveo\artisan" schedule:run #this is for faveo incoming mail,esacalation, faveo update check.
c:\inetpub\wwwroot\faveo\artisan queue:listen database --queue=reports #this is for the reports.
c:\inetpub\wwwroot\faveo\artisan" queue:listen database --queue=recurring #this is for recurring.
c:\inetpub\wwwroot\faveo\artisan queue:work database #this is for outgoing mail.
```
- The above commands will be the task scheduler commands.
- Finally under the Finish section select the checkbox to open the properties window after finish and click the finish button.
- In the properties, window selects the Triggers tab, click on edit and select the checkbox for “Repeat task every” set values to run every 5 minutes indefinitely and click on OK.
### 7. SSL Installation
Secure Sockets Layer (SSL) is a standard security technology for establishing an encrypted link between a server and a client. Let’s Encrypt is a free, automated, and open certificate authority.
Faveo Requires HTTPS so the SSL is a must to work with the latest versions of faveo, so for the internal network and if there is no domain for free you can use the Self-Signed-SSL.
[Let’s Encrypt SSL installation documentation](/docs/installation/providers/enterprise/windows-iis-ssl)
[Self-Signed SSL installation documentation](/docs/installation/providers/enterprise/self-signed-ssl-windows)
### 8. Install Faveo
Now you can install Faveo via [GUI](/docs/installation/installer/gui) Wizard or [CLI](/docs/installation/installer/cli)
### 9. Final step
The final step is to have fun with your newly created instance, which should be up and running to http://localhost or the domain you have configured Faveo with.