Setup Email Server for Faveo
![]()
Introduction:
Setting up your own email server on Ubuntu Server allows you to have complete control over your email communication without relying on third-party services. By following these instructions, you can bypass daily email limits and ensure reliable delivery for your business or personal needs.
Setting up your own email server on Ubuntu 22.04/Ubuntu 24.04 involves several steps including installing and configuring the necessary software, setting up DNS records, and securing your server. Below are the instructions, commands, and DNS records you’ll need:
1. Set the Server Hostname.
sudo hostnamectl set-hostname mail.yourdomain.com
Adding Local DNS Entry
127.0.0.1 localhost mail.example.com
2. Apache Installation
Run the following commands as sudoers or Login as root user by typing the command below
sudo su
Update your package list
apt update && apt upgrade -y
Apache should come pre-installed with your server. If it’s not, install it with:
apt-get install -y software-properties-common
sudo add-apt-repository ppa:ondrej/apache2
sudo apt update
apt install apache2 -y
systemctl start apache2
systemctl enable apache2
Configure a new roundcube in apache by doing:
nano /etc/apache2/sites-available/roundcube.conf
Pick a editor of your choice copy the following and replace ‘–DOMAINNAME–’ with the Domainname mapped to your Server’s IP or you can just comment the ‘ServerName’ directive if Roundcube is the only website served by your server.
<IfModule !headers_module>
    LoadModule headers_module modules/mod_headers.so
</IfModule>

FileETag None
ServerTokens prod
ServerSignature off
TraceEnable off
#Protocols http/1.1 h2

<VirtualHost *:80>
    ServerName mail.domain.com
    ServerAdmin webmaster@localhost
    DocumentRoot /var/www/roundcube

    <Directory /var/www/roundcube/>
        Options Indexes FollowSymLinks
        AllowOverride All
        Require all granted
    </Directory>
        ErrorLog ${APACHE_LOG_DIR}/error.log
        CustomLog ${APACHE_LOG_DIR}/access.log combined
</VirtualHost>

<IfModule mod_headers.c>
    Header set Content-Security-Policy "frame-ancestors 'self'"
    Header set Referrer-Policy "no-referrer-when-downgrade"
    Header set X-Content-Type-Options "nosniff"
    Header set X-Frame-Options "SAMEORIGIN"
    Header set X-XSS-Protection "1; mode=block"
    Header set Permissions-Policy "geolocation=(self), microphone=()"
    Header set Cache-Control "no-store, no-cache, must-revalidate, proxy-revalidate, max-age=0"
    Header set Expect-CT "max-age=86400, enforce"
    Header set Strict-Transport-Security "max-age=31536000; includeSubDomains"
</IfModule>
3. Install PHP 8.2+
First add this PPA repository:
add-apt-repository ppa:ondrej/php
Then install php 8.2 with these extensions:
apt update
apt install -y php8.2 libapache2-mod-php8.2 php8.2-mysql \
    php8.2-cli php8.2-common php8.2-fpm php8.2-soap php8.2-gd \
    php8.2-opcache  php8.2-mbstring php8.2-zip \
    php8.2-bcmath php8.2-intl php8.2-xml php8.2-curl  \
    php8.2-imap php8.2-ldap php8.2-gmp php8.2-redis php8.2-imagick
After installing PHP 8.2, run the commands below to open PHP default config file.
sudo sed -i -e 's|^file_uploads =.*|file_uploads = On|' \
           -e 's|^allow_url_fopen =.*|allow_url_fopen = On|' \
           -e 's|^short_open_tag =.*|short_open_tag = On|' \
           -e 's|^memory_limit =.*|memory_limit = 256M|' \
           -e 's|^;cgi.fix_pathinfo=1.*|cgi.fix_pathinfo = 0|' \
           -e 's|^upload_max_filesize =.*|upload_max_filesize = 100M|' \
           -e 's|^post_max_size =.*|post_max_size = 100M|' \
           -e 's|^max_execution_time =.*|max_execution_time = 360|' \
           -e 's|^;pcre.backtrack_limit=100000.*|pcre.backtrack_limit = 100000|' \
           -e 's|^;date.timezone =.*|date.timezone = "Asia/Kolkata"|' \
           /etc/php/8.2/fpm/php.ini
Enable the Configuration:
a2enmod proxy_fcgi setenvif rewrite headers
a2dissite 000-default.conf
a2ensite roundcube.conf
a2enconf php8.2-fpm
service php8.2-fpm restart
service apache2 restart
4. install composer
php -r "copy('https://getcomposer.org/installer', 'composer-setup.php');"
php -r "if (hash_file('sha384', 'composer-setup.php') === 'dac665fdc30fdd8ec78b38b9800061b4150413ff2e3b6f88543c636f7cd84f6db9189d43a81e5503cda447da73c7e5b6') { echo 'Installer verified'; } else { echo 'Installer corrupt'; unlink('composer-setup.php'); } echo PHP_EOL;"
php composer-setup.php
php -r "unlink('composer-setup.php');"
sudo mv composer.phar /usr/local/bin/composer
5. Install MySQL and Configure
Install Mysql 8.0. Note that this only installs the package, but does not setup Mysql. This is done later in the instructions:
sudo apt update
sudo apt install mysql-server
sudo systemctl start mysql
sudo systemctl enable mysql
Secure your MySql installation by executing the below command. Set Password for mysql root user, remove anonymous users, disallow remote root login, remove the test databases and finally reload the privilege tables.
mysql_secure_installation
With MySQL you can set up the database by issuing the following commands:
CREATE DATABASE roundcubemail CHARACTER SET utf8 COLLATE utf8_general_ci;
CREATE USER 'roundcube'@'localhost' IDENTIFIED BY 'Strong-Password';
GRANT ALL PRIVILEGES ON roundcubemail . * TO 'roundcube'@'localhost';
FLUSH PRIVILEGES;
exit
6. Install Roundcube
Download Roundcube:
cd /tmp
wget https://github.com/roundcube/roundcubemail/releases/download/1.6.8/roundcubemail-1.6.8-complete.tar.gz
Extract Roundcube:
tar -zxvf roundcubemail-1.6.8-complete.tar.gz
sudo mv roundcubemail-1.6.8 /var/www/roundcube
Set Permissions
sudo chown -R www-data:www-data /var/www/roundcube
sudo chmod -R 755 /var/www/roundcube
With MySQL you can import the initial tables with the following command:
mysql roundcubemail < /var/www/roundcube/SQL/mysql.initial.sql
Now open your web browser and go to http://mail.example.com/installer and you will see the following screen:
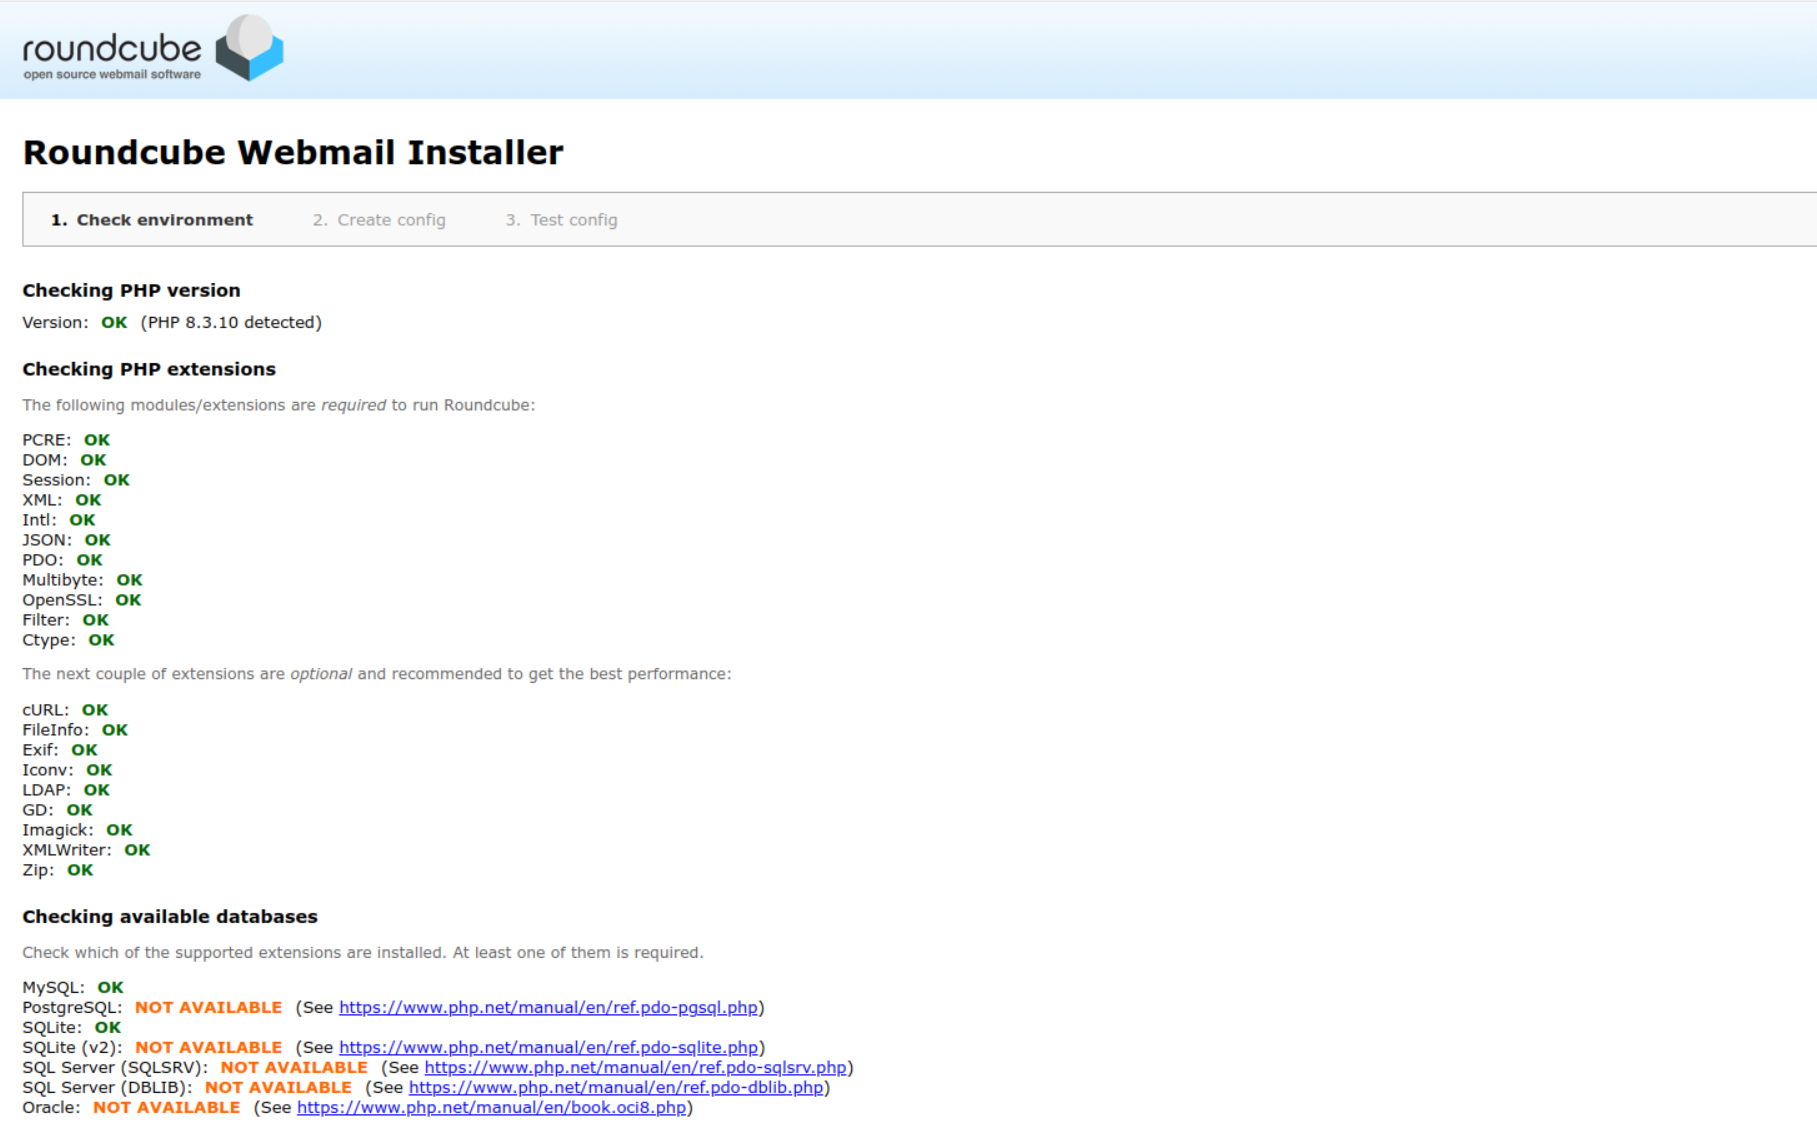
If all required modules and extensions are installed, press NEXT and go to the next step.
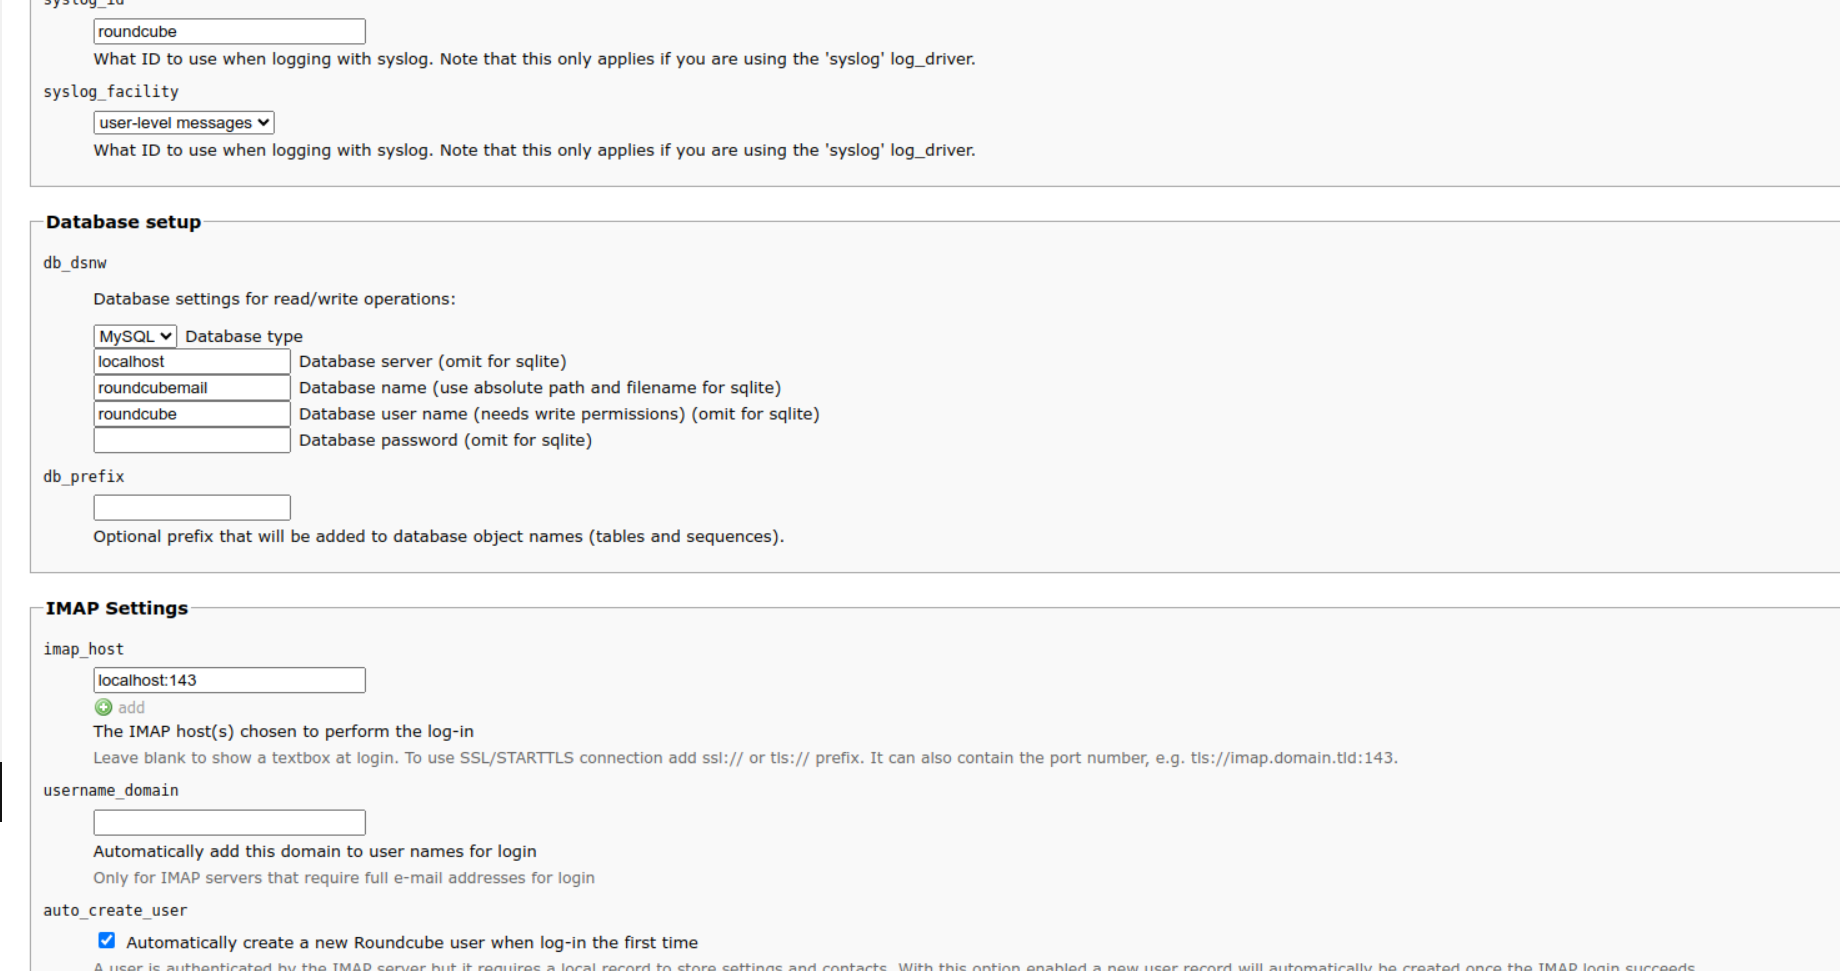
On the next page, navigate to Database Setup settings and enter the database name, user and password that you created above.
Under SMTP settings, check the box ‘Use the current IMAP username and password for SMTP authentication’:
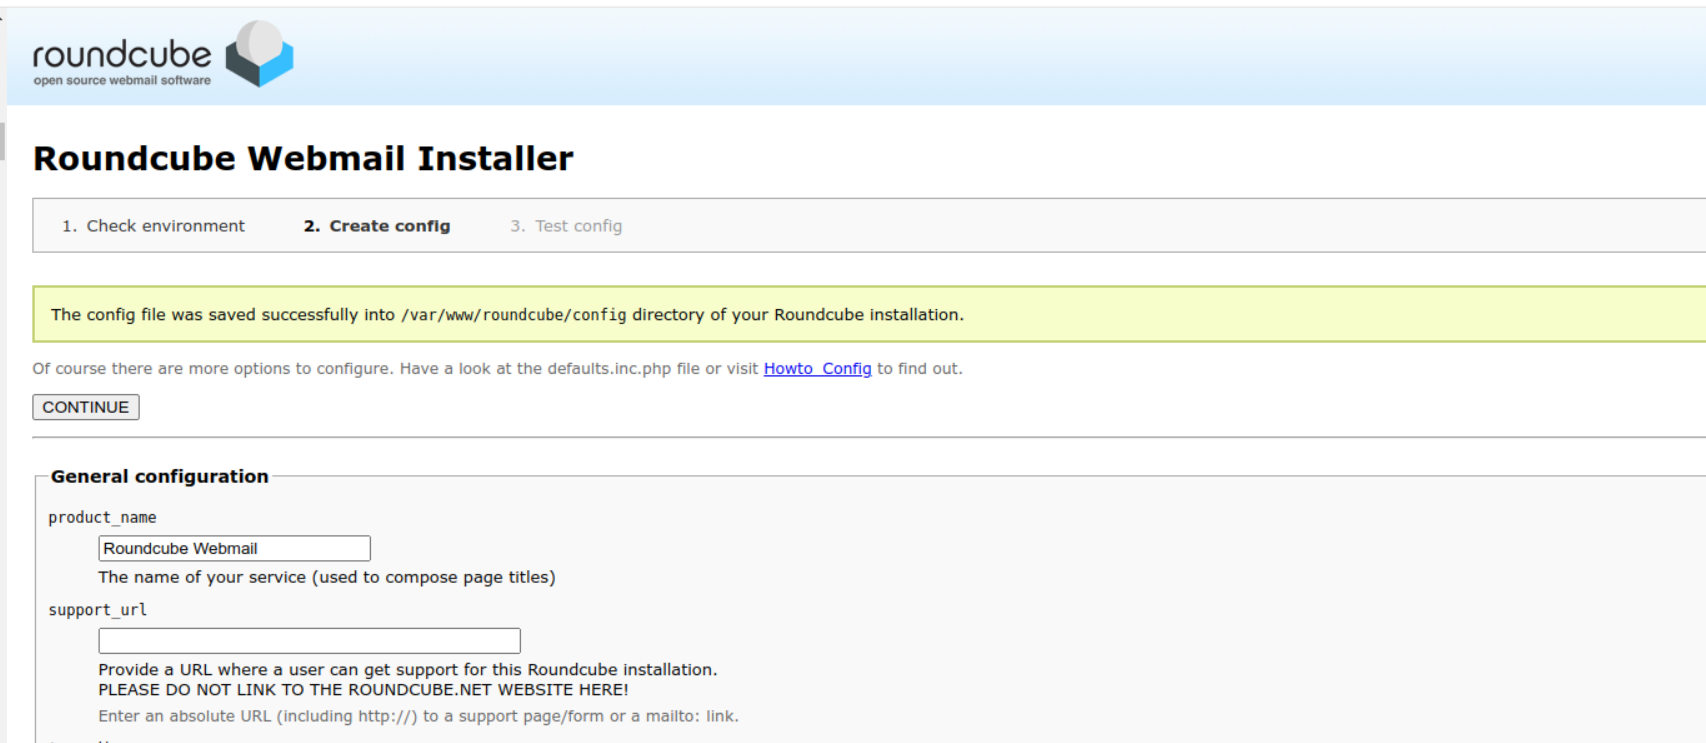
After complete configuration , Press CREATE CONFIG to finish the installation. You will then be notified that the configuration has been successfully created.
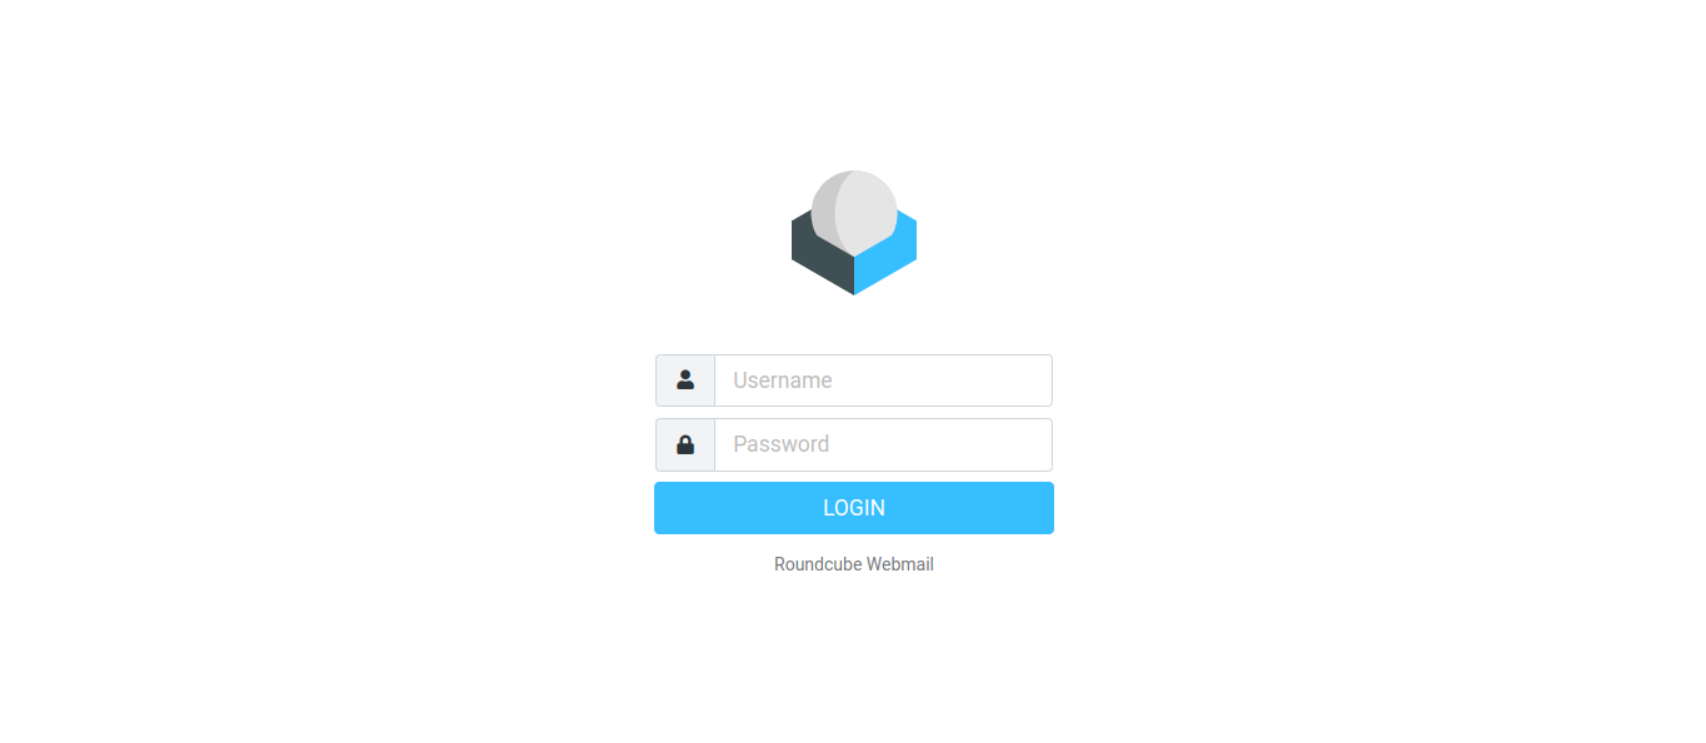
Once everything is setup and working, open your terminal and remove the installation directory with the following command:
rm -rf /var/www/roundcube/installer
Access Roundcube at http://mail.yourdomain.com.
7. Install LetsEncrypt SSL
Install Certbot and the Apache plugin:
apt install python3-certbot-apache
Obtain and configure the SSL certificate:
certbot --apache -d mail.domain.com
Setting up auto renewal of the certificate
Create a new /etc/cron.d/roundcube-ssl file with:
echo "45 2 * * 6 /etc/letsencrypt/ && ./certbot renew && systemctl restart apache2" | sudo tee /etc/cron.d/roundcube-ssl
8. Install & Configure Postfix
install the Postfix server by running the command below.
sudo apt update -y
sudo apt install -y postfix
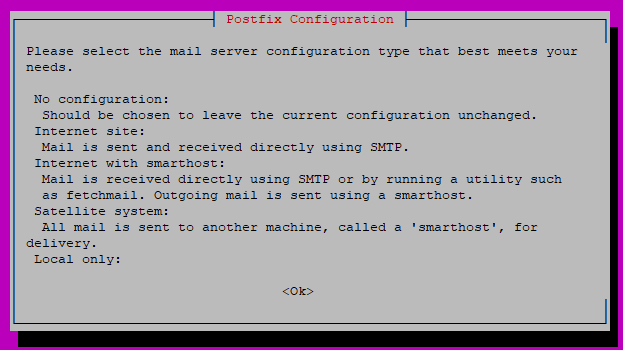
You’ll get the Postfix configuration screen, as shown below. Press Tab and Enter to continue.
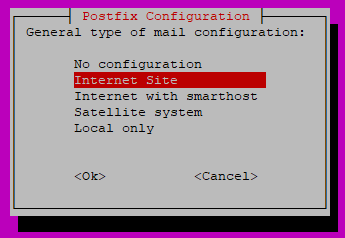
On the next screen, select Internet Site, then Tab and Enter.
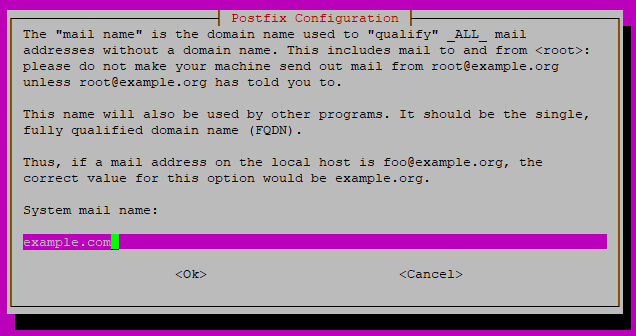
Enter the system mail name, which is your domain name. For instance, the server name is mail.example.com, so you’ll enter example.com here.
Back up the the /etc/postfix/main.cf file, and create a new one.
sudo mv /etc/postfix/main.cf /etc/postfix/main.cf.bk
sudo nano /etc/postfix/main.cf
Enter the information below to the new file. Replace example.com with your domain name throughout the file. Make sure the value of smtpd_tls_cert_file and smtpd_tls_key_file point to your SSL certificate.
smtpd_banner = $myhostname ESMTP $mail_name
biff = no
append_dot_mydomain = no
readme_directory = no

# TLS parameters
smtp_use_tls = yes
smtp_tls_security_level = may
smtp_tls_session_cache_database = btree:${data_directory}/smtp_scache

smtpd_use_tls = yes
smtpd_tls_security_level = may
smtpd_tls_session_cache_database = btree:${data_directory}/smtpd_scache
smtpd_tls_cert_file = /etc/letsencrypt/live/domain.com/fullchain.pem
smtpd_tls_key_file = /etc/letsencrypt/live/domain.com/privkey.pem
smtpd_relay_restrictions = permit_mynetworks, permit_sasl_authenticated,  reject_unauth_destination
smtpd_recipient_restrictions = permit_mynetworks, permit_sasl_authenticated, reject_unauth_destination

smtpd_sasl_auth_enable = yes
smtpd_sasl_type = dovecot
smtpd_sasl_path = private/auth

virtual_transport = lmtp:unix:private/dovecot-lmtp
virtual_mailbox_domains = /etc/postfix/virtual_mailbox_domains

myhostname = mail.domain.com
myorigin = /etc/mailname
mydestination =  localhost.$mydomain, localhost
relayhost =
mynetworks = 127.0.0.0/8 [::ffff:127.0.0.0]/104 [::1]/128
mailbox_size_limit = 0
recipient_delimiter = +
inet_interfaces = all
inet_protocols = all
alias_maps = hash:/etc/aliases
alias_database = hash:/etc/aliases
Save and close the file.
9. Create Virtual Mail Box Domains
The main.cf configuration file instructs postfix to look for email domains in the /etc/postfix/virtual_mailbox_domains file. Create the file:
nano /etc/postfix/virtual_mailbox_domains
Add the information below to the file and replace example.com with your domain name.
example.com #domain
Use the postmap command to change /etc/postfix/virtual_mailbox_domains to a format recognizable by Postfix. Run this command every time you edit the file, for instance, after adding more domains to the file.
sudo postmap /etc/postfix/virtual_mailbox_domains
Edit the /etc/postfix/master.cf configuration file to enable the SMTP service.
nano /etc/postfix/master.cf
Add or Modify the SMTPS Service:
submission inet n       -       y       -       -       smtpd

smtps     inet  n       -       y       -       -       smtpd
  -o syslog_name=postfix/smtps
  -o smtpd_tls_wrappermode=yes
  -o smtpd_sasl_auth_enable=yes
  -o smtpd_relay_restrictions=permit_sasl_authenticated,reject
  -o milter_macro_daemon_name=ORIGINATING
Save and close the file.
10. Install & Configure Dovecot
Install the Dovecot package and all the dependency packages required to run the imap, pop3, and lmtp service.
sudo apt install -y dovecot-core dovecot-imapd dovecot-pop3d dovecot-lmtpd
Edit the 10-mail.conf file to specify the mail storage location:
nano /etc/dovecot/conf.d/10-mail.conf
Find the line:
mail_location = mbox:~/mail:INBOX=/var/mail/%u
Replace it with:
mail_location = maildir:/var/mail/vhosts/%d/%n
Save and close the file. The %d represents the domain, and %n represents the users. This means that you’ll need to create a sub-directory in the /var/mail/vhosts for every domain receiving emails on your server.
Create the directory for your domain:
mkdir -p /var/mail/vhosts/example.com
Create a group and user for Dovecot:
sudo groupadd -g 5000 vmail
sudo useradd -r -g vmail -u 5000 vmail -d /var/mail/vhosts -c "Virtual Mail User"
Set ownership for the mail directory:
sudo chown -R vmail:vmail /var/mail/vhosts/
Edit the 10-master.conf file to set up the SSL and LMTP services:
nano /etc/dovecot/conf.d/10-master.conf
Add or modify the following sections:
inet_listener imaps {
   port = 993
   ssl = yes
}

inet_listener pop3s {
   port = 995
   ssl = yes
}

service lmtp {
   unix_listener /var/spool/postfix/private/dovecot-lmtp {
     mode = 0600
     user = postfix
     group = postfix
   }
}

unix_listener /var/spool/postfix/private/auth {
  mode = 0666
  user = postfix
  group = postfix
}
Save and close the file.
Edit the 10-auth.conf file to configure authentication mechanisms:
nano /etc/dovecot/conf.d/10-auth.conf
Set:
disable_plaintext_auth = yes
auth_mechanisms = plain login
Disable system account authentication and enable password file:
# Comment out the following line:
#!include auth-system.conf.ext

# Uncomment this line:
!include auth-passwdfile.conf.ext
Edit the Dovecot password file, auth-passwdfile.conf.ext.
nano /etc/dovecot/conf.d/auth-passwdfile.conf.ext
Update it with:
passdb {
    driver = passwd-file
    args = scheme=PLAIN username_format=%u /etc/dovecot/dovecot-users
}

userdb {
    driver = static
    args = uid=vmail gid=vmail home=/var/mail/vhosts/%d/%n
}
Create the /etc/dovecot/dovecot-users password file. This file is a plain text database that holds email users on your server.
nano /etc/dovecot/dovecot-users
Add your email users in the following format:
- Replace EXAMPLE_PASSWORD with strong passwords and example.com with your domain.
admin@example.com:{plain}EXAMPLE_PASSWORD
info@example.com:{plain}EXAMPLE_PASSWORD
billing@example.com:{plain}EXAMPLE_PASSWORD
Configure Dovecot to Use the SSL Certificate. Open the /etc/dovecot/conf.d/10-ssl.conf file.
sudo nano /etc/dovecot/conf.d/10-ssl.conf
Set:
ssl = required
ssl_cert = </etc/letsencrypt/live/example.com/fullchain.pem
ssl_key = </etc/letsencrypt/live/example.com/privkey.pem
Restart the postfix and dovecot services to use the new settings.
sudo service postfix restart
sudo service dovecot restart
11. DNS Records Setup
A Record
Maps your mail server domain to its IP address.
- Type: A
- Name: mail.domain.com
- Value: [Your Mail Server’s IP Address]
- TTL: 3600 (default or your preferred value)
mail.domain.com. IN A 203.0.113.1
MX Record
Specifies the mail servers responsible for handling email for your domain.
- Type: MX
- Name: domain.com
- Priority: 10 (or your preferred priority)
- TTL: 3600 (default or your preferred value)
domain.com. IN MX 10 mail.domain.com.
SPF Record
Defines which mail servers are authorized to send email on behalf of your domain, helping to prevent spoofing.
- Type: TXT
- Name: domain.com
- Value: v=spf1 ip4:[Your Mail Server’s IP Address] -all
- TTL: 3600 (default or your preferred value)
domain.com. IN TXT "v=spf1 ip4:203.0.113.1 -all"
DMARC Record
Provides instructions on how to handle emails that fail SPF or DKIM checks and where to send reports.
- Type: TXT
- Name: _dmarc.domain.com
- Value: v=DMARC1; p=none; rua=mailto:admin@domain.com
- TTL: 3600 (default or your preferred value)
_dmarc.domain.com. IN TXT "v=DMARC1; p=none; rua=mailto:admin@domain.com"
Generate DKIM Keys
Install OpenDKIM:
sudo apt update
sudo apt install opendkim opendkim-tools
Create a directory for your DKIM keys and generate a key pair:
sudo mkdir -p /etc/opendkim/keys/domain.com
sudo opendkim-genkey -t -s default -d domain.com -b 2048 -r -a rsa-sha256
sudo mv default.private /etc/opendkim/keys/domain.com/
sudo mv default.txt /etc/opendkim/keys/domain.com/
This generates two files:
- default.private (your private key)
- default.txt (your DKIM DNS TXT record)
Edit the OpenDKIM configuration file to include your DKIM settings:
sudo nano /etc/opendkim.conf
Add or modify the following lines:
Domain                  domain.com
KeyFile                 /etc/opendkim/keys/domain.com/default.private
Selector                default
Socket                  inet:8891@localhost
Configure your mail server (Postfix) to use OpenDKIM:
sudo nano /etc/postfix/main.cf
Add or modify these lines:
milter_protocol = 2
milter_default_action = accept
smtpd_milters = inet:localhost:8891
non_smtpd_milters = $smtpd_milters
Restart Postfix and OpenDKIM:
sudo service postfix restart
sudo service opendkim restart
DKIM Record
- Type: TXT
- Name: default._domainkey.domain.com
- Value: Copy the entire content from the default.txt file
default._domainkey.domain.com. IN TXT "v=DKIM1; k=rsa; p=MIIBIjANBgkqhkiG9w0BAQEFAAOCAQ8AMIIBCgKCAQEA7A6+Nw6...<rest of your key>"