Installing Faveo Helpdesk on Debian With Nginx Webserver
![]()
Faveo can run on Debian 11(Bullseye), Debian 12 (Bookworm).
This document is meant for Faveo Freelancer, Paid and Enterprise Versions.
Installation steps :
Faveo depends on the following:
- Apache (with mod_rewrite enabled)
- PHP 8.4+ with the following extensions: curl, dom, gd, json, mbstring, openssl, pdo_mysql, tokenizer, zip
- MySQL 8.0+ or MariaDB 10.6+
- SSL ,Trusted CA Signed or Slef-Signed SSL
1. Update your package list
Run the following commands as sudoers or Login as root user by typing the command below
sudo su
apt update && apt upgrade -y
1.a. Nginx should come pre-installed with your server. If it’s not, install it with:
apt install nginx
systemctl start nginx
systemctl enable nginx
1.b. Install some Utility packages
apt install -y git wget curl unzip nano zip
1.c. PHP 8.4+
Note: In Debian upon installing PHP packages apache2 will be automatically installed and started. It needs to be removed after installing PHP8.4
Before we install PHP 8.4, it’s important to make sure your system is up to date by running the following apt commands.
sudo apt update
sudo apt install apt-transport-https lsb-release ca-certificates
Add the Ondřej Surý PHP repository.
wget -O /etc/apt/trusted.gpg.d/php.gpg https://packages.sury.org/php/apt.gpg
echo "deb https://packages.sury.org/php/ $(lsb_release -sc) main" | sudo tee /etc/apt/sources.list.d/php.list
Now Install PHP 8.4 and extensions.
sudo apt update
apt install -y php8.4 libapache2-mod-php8.4 php8.4-mysql \
    php8.4-cli php8.4-common php8.4-fpm php8.4-soap php8.4-gd \
    php8.4-opcache  php8.4-mbstring php8.4-zip \
    php8.4-bcmath php8.4-intl php8.4-xml php8.4-curl  \
    php8.4-imap php8.4-ldap php8.4-gmp php8.4-redis php8.4-memcached
Now remove the apache2 package
apt remove apache2
After installing PHP 8.4, run the commands below to open PHP default config file for Nginx…
nano /etc/php/8.4/fpm/php.ini
Then make the changes on the following lines below in the file and save. The value below are great settings to apply in your environments.
file_uploads = On
allow_url_fopen = On
short_open_tag = On
memory_limit = 256M
cgi.fix_pathinfo = 0
upload_max_filesize = 100M
max_execution_time = 360
1.d.Setting Up ionCube
wget http://downloads3.ioncube.com/loader_downloads/ioncube_loaders_lin_x86-64.tar.gz
tar xvfz ioncube_loaders_lin_x86-64.tar.gz
Make the note of path and directory from the above command.
Copy ion cube loader to Directory. Replace your yourpath below with actual path that was shown with the first command below.
php -i | grep extension_dir
cp ioncube/ioncube_loader_lin_8.4.so /usr/lib/php/'replaceyourpath'
sed -i '2 a zend_extension = "/usr/lib/php/'replaceyourpath'/ioncube_loader_lin_8.4.so"' /etc/php/8.4/fpm/php.ini
sed -i '2 a zend_extension = "/usr/lib/php/'replaceyourpath'/ioncube_loader_lin_8.4.so"' /etc/php/8.4/cli/php.ini
systemctl restart nginx
systemctl restart php8.4-fpm
1.e. Install MySQL/MariaDB
The official Faveo installation uses Mysql/MariaDB as the database system and this is the only official system we support. While Laravel technically supports PostgreSQL and SQLite, we can’t guarantee that it will work fine with Faveo as we’ve never tested it. Feel free to read Laravel’s documentation on that topic if you feel adventurous.
You can install either MySQL or MariaDB. We have given options for both MySQL and MariaDB below.
1.e.1. MySQL
Install Mysql 8.0. Note that this only installs the package, but does not setup Mysql. This is done later in the instructions:
For Debian 11, 12
sudo apt update
wget https://dev.mysql.com/get/mysql-apt-config_0.8.29-1_all.deb
sudo dpkg -i mysql-apt-config*
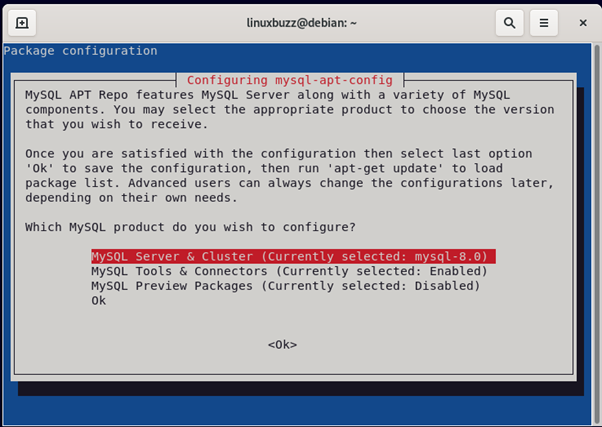
A pop-up window displays after you run the above command. Select MySQL Server & Cluster with the Arrow key and hit Enter.
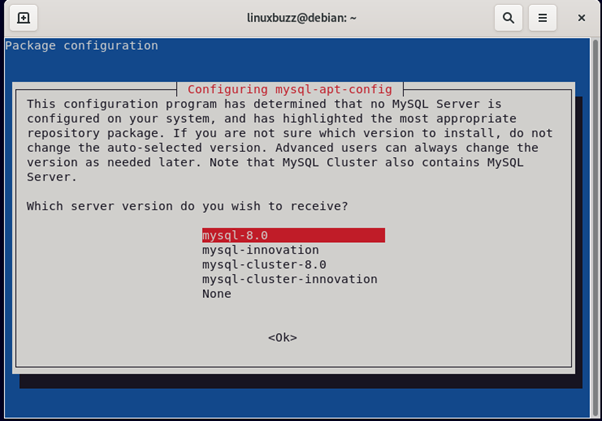
In this instance, MySQL-8.0 is the version of the server that was available. Select MySQL-8.0 and click Enter.
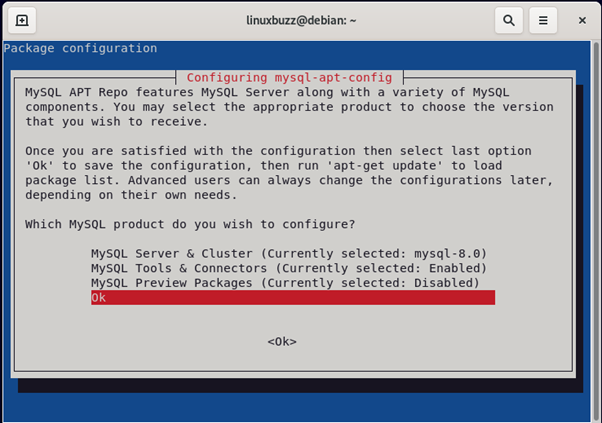
Now, click OK on your screen to finish the configuration.
sudo apt update
sudo apt install mysql-server
sudo systemctl start mysql
sudo systemctl enable mysql
Secure your MySql installation by executing the below command. Set Password for mysql root user by providing a strong password combination of Uppercase, Lowercase, alphanumeric and special symbols, remove anonymous users, disallow remote root login, remove the test databases and finally reload the privilege tables.
sudo mysql_secure_installation
1.e.2. MariaDB 10.6
Install MariaDB 10.6. Note that this only installs the package, but does not setup Mysql. This is done later in the instructions:
NOTE : Debian 12 does not currently support MariaDB version 10.6.
For Debian 11
sudo apt update
sudo apt-get install curl software-properties-common dirmngr
curl -LsS -O https://downloads.mariadb.com/MariaDB/mariadb_repo_setup
sudo bash mariadb_repo_setup --mariadb-server-version=10.6
sudo apt-get update
sudo apt-get install mariadb-server mariadb-client
sudo systemctl start mariadb
sudo systemctl enable mariadb
Secure your MySql installation by executing the below command. Set Password for mysql root user by providing a strong password combination of Uppercase, Lowercase, alphanumeric and special symbols, remove anonymous users, disallow remote root login, remove the test databases and finally reload the privilege tables.
sudo mysql_secure_installation
1.f. Install wkhtmltopdf
Wkhtmltopdf is an open source simple and much effective command-line shell utility that enables user to convert any given HTML (Web Page) to PDF document or an image (jpg, png, etc).
It uses WebKit rendering layout engine to convert HTML pages to PDF document without losing the quality of the pages. Its is really very useful and trustworthy solution for creating and storing snapshots of web pages in real-time.
For Debian 11
apt-get -y install wkhtmltopdf
For Debian 12
wget https://github.com/wkhtmltopdf/packaging/releases/download/0.12.6.1-3/wkhtmltox_0.12.6.1-3.bookworm_amd64.deb
sudo apt install ./wkhtmltox*bookworm_amd64.deb
1.g. Install Meilisearch
MeiliSearch is an open-source search engine developed in Rust that delivers flexible search and indexing capabilities. It adeptly handles typos, supports full-text search, synonyms, and comes packed with various features, making it an ideal choice for elevating search functionalities in Faveo.
Meilisearch installation documentation
2. Upload Faveo
Please download Faveo Helpdesk from https://billing.faveohelpdesk.com and upload it to below directory
mkdir -p /var/www/faveo/
cd /var/www/faveo/
Extracting the Faveo-Codebase zip file
unzip "Filename.zip" -d /var/www/faveo
3. Setup the database
Log in with the root account to configure the database.
mysql -u root -p
Create a database called ‘faveo’.
CREATE DATABASE faveo;
Create a user called ‘faveo’ and its password ‘strongpassword’.
CREATE USER 'faveo'@'localhost' IDENTIFIED BY 'strongpassword';
We have to authorize the new user on the faveo db so that he is allowed to change the database.
GRANT ALL ON faveo.* TO 'faveo'@'localhost';
And finally we apply the changes and exit the database.
FLUSH PRIVILEGES;
exit
NOTE : Please refrain from making direct MySQL/MariaDB modifications. Contact our support team for assistance.
4. Configure Nginx webserver
4.a. Give proper permissions to the project directory by running:
chown -R www-data:www-data /var/www/faveo
cd /var/www/faveo/
find . -type f -exec chmod 644 {} \;
find . -type d -exec chmod 755 {} \;
4.b. Create a copy of Nginx default config file Finally, configure Nginx site configuration file for Faveo. This file will control how users access Faveo content. Run the commands below to create a new configuration file called faveo
nano /etc/nginx/sites-available/faveo
Then copy and paste the content below into the file and save it. Replace the highlighted line with your own domain name and directory root location.
server {
    listen 80;
    listen [::]:80;
    root /var/www/faveo/public;
    index  index.php index.html index.htm;
    server_name  example.com www.example.com;

     client_max_body_size 100M;

    location / {
        try_files $uri $uri/ /index.php?$query_string;
    }

    location ~ \.php$ {
               include snippets/fastcgi-php.conf;
               fastcgi_pass unix:/var/run/php/php8.4-fpm.sock;
               fastcgi_param SCRIPT_FILENAME $document_root$fastcgi_script_name;
               include fastcgi_params;
    }
}
Save the file and exit.
4.c. Enable the Faveo and remove the default site After configuring the VirtualHost above delete the deafult Virtualhost and enable the Faveo Virtualhost by running the commands below
rm -f /etc/nginx/sites-available/default /etc/nginx/sites-enabled/default
ln -s /etc/nginx/sites-available/faveo /etc/nginx/sites-enabled/
systemctl restart nginx
systemctl restart php8.4-fpm
5. Configure cron job
Faveo requires some background processes to continuously run.
Basically those crons are needed to receive emails
To do this, setup a cron that runs every minute that triggers the following command php artisan schedule:run.
(sudo -u www-data crontab -l 2>/dev/null; echo "* * * * * /usr/bin/php /var/www/faveo/artisan schedule:run 2>&1") | sudo -u www-data crontab -
6. Redis Installation
Redis is an open-source (BSD licensed), in-memory data structure store, used as a database, cache and message broker.
This will improve system performance and is highly recommended.
Redis installation documentation
7. SSL Installation
Secure Sockets Layer (SSL) is a standard security technology for establishing an encrypted link between a server and a client. Let’s Encrypt is a free, automated, and open certificate authority.
This is an optional step and will improve system security and is highly recommended.
Let’s Encrypt SSL installation documentation
Paid SSL Certificate Documentation
Self Signed SSL Certificate Documentation
8. Install Faveo
At this point if the domainname is propagated properly with your server’s IP you can open Faveo in browser just by entering your domainname. You can also check the Propagation update by Visiting this site www.whatsmydns.net.
Now you can install Faveo via GUI Wizard or CLI
9. Faveo Backup
At this stage, Faveo has been installed, it is time to setup the backup for Faveo File System and Database. Follow this article to setup Faveo backup.
10. Webserver Hardening
Once the installation is complete, it is recommended to harden the webserver to enhance security. Follow our guide to apply best practices such as disabling unnecessary modules, enforcing security headers, and restricting access permissions.
11. Final step
The final step is to have fun with your newly created instance, which should be up and running to http://localhost or the domain you have configured Faveo with.