Installing Faveo Helpdesk on Ubuntu With Openlitespeed Web Server
![]()
Faveo can run on Ubuntu 20.04 (Focal Fosa), Ubuntu 22.04 (Jammy Jellyfish).
Installation steps
Faveo depends on the following:
- Web Server Openlitespeed
- PHP 8.1+ with the following extensions: curl, dom, gd, json, mbstring, openssl, pdo_mysql, tokenizer, zip
- MySQL 8.0+ or MariaDB 10.6+
- SSL ,Trusted CA Signed or Slef-Signed SSL
1. LOMP Installation
The LOMP stack is an acronym for Linux, OpenLiteSpeed, MariaDB, and PHP. OpenLiteSpeed is the open-source option for LiteSpeed web servers.
In this tutorial, you will set up a LOMP server running on Ubuntu 22.04. At the time of writing, the current versions are PHP 8.1, MariaDB 10.6, and OpenLiteSpeed 1.7.
Run the following commands as sudoers or Login as root user by typing the command below
sudo su
1.a. Update your package list
apt update && apt upgrade -y
1.b. Installing OpenLiteSpeed With LSPHP 8.1
OpenLiteSpeed hosts its code on its own repository. Add this repository to the apt package manager’s sources list with the following command:
sudo wget -O - https://repo.litespeed.sh | sudo bash
Update the list of repositories to ensure that the newly added repository is scanned by the apt package manager:
sudo apt update
Next, install the openlitespeed package:
sudo apt install openlitespeed lsphp81 lsphp81-curl lsphp81-imap lsphp81-mysql lsphp81-ldap lsphp81-redis lsphp81-ioncube
If prompted, enter your password, then confirm the installation with Y.
This command installs the Openlitespeed server package and LSPHP 8.1. LiteSpeed PHP (LSPHP) is a PHP interpreter integrated with the LiteSpeed Server Application Programming Interface (LSAPI).
Now that the OpenLiteSpeed server is installed, you will secure it by updating the default administrator account.
1.c. Setting the Administrative Password
Before testing the server, you will set a new administrative password for OpenLiteSpeed. You can do this by running a script provided by OpenLiteSpeed:
sudo /usr/local/lsws/admin/misc/admpass.sh
You will be asked to provide a username for the administrative user. If you press ENTER without choosing a new username, the default username admin will be used. You can use whatever administrative username you prefer. Then you will be prompted to create and confirm a new password for the account. Put in the administrative password you prefer, then press ENTER again. The script will confirm a successful update:
Output
Administrator's username/password is updated successfully!
You have now secured the admin account. Next, you will test the server to ensure it’s running properly.
1.d. Connecting to the Server
In this step, you will connect to your server.
OpenLiteSpeed should have started automatically after it was installed. You can verify if it started with the systemctl status command:
sudo systemctl status lsws
You will receive the following output:
Output
● lshttpd.service - OpenLiteSpeed HTTP Server
     Loaded: loaded (/etc/systemd/system/lshttpd.service; enabled; vendor preset: enabled)
     Active: active (running) since Wed 2022-03-16 08:59:09 UTC; 2min 26s ago
    Process: 32997 ExecStart=/usr/local/lsws/bin/lswsctrl start (code=exited, status=0/SUCCESS)
   Main PID: 33035 (litespeed)
     CGroup: /system.slice/lshttpd.service
             ├─33035 openlitespeed (lshttpd - main)
             ├─33044 openlitespeed (lscgid)
             └─33073 openlitespeed (lshttpd - #01)
The active (running) message indicates that OpenLiteSpeed is running.
The server should now be running. Press CTRL+C to exit the service output.
If your server is not running, you can start the server using systemctl:
sudo systemctl start lsws
Before visiting it in your browser, you will need to open some ports on your firewall, which you can achieve with the *ufw command:
sudo ufw allow 8088,7080,443,80/tcp
The first port, 8088, is the default port for OpenLiteSpeed’s example site. After allowing it with ufw, it should now be accessible to the public. In your web browser, navigate to your server’s IP address or domain name, followed by :8088 to specify the port:
http://server_domain_or_IP:8088
Your browser will load the default OpenLiteSpeed web page, which will match the following image:
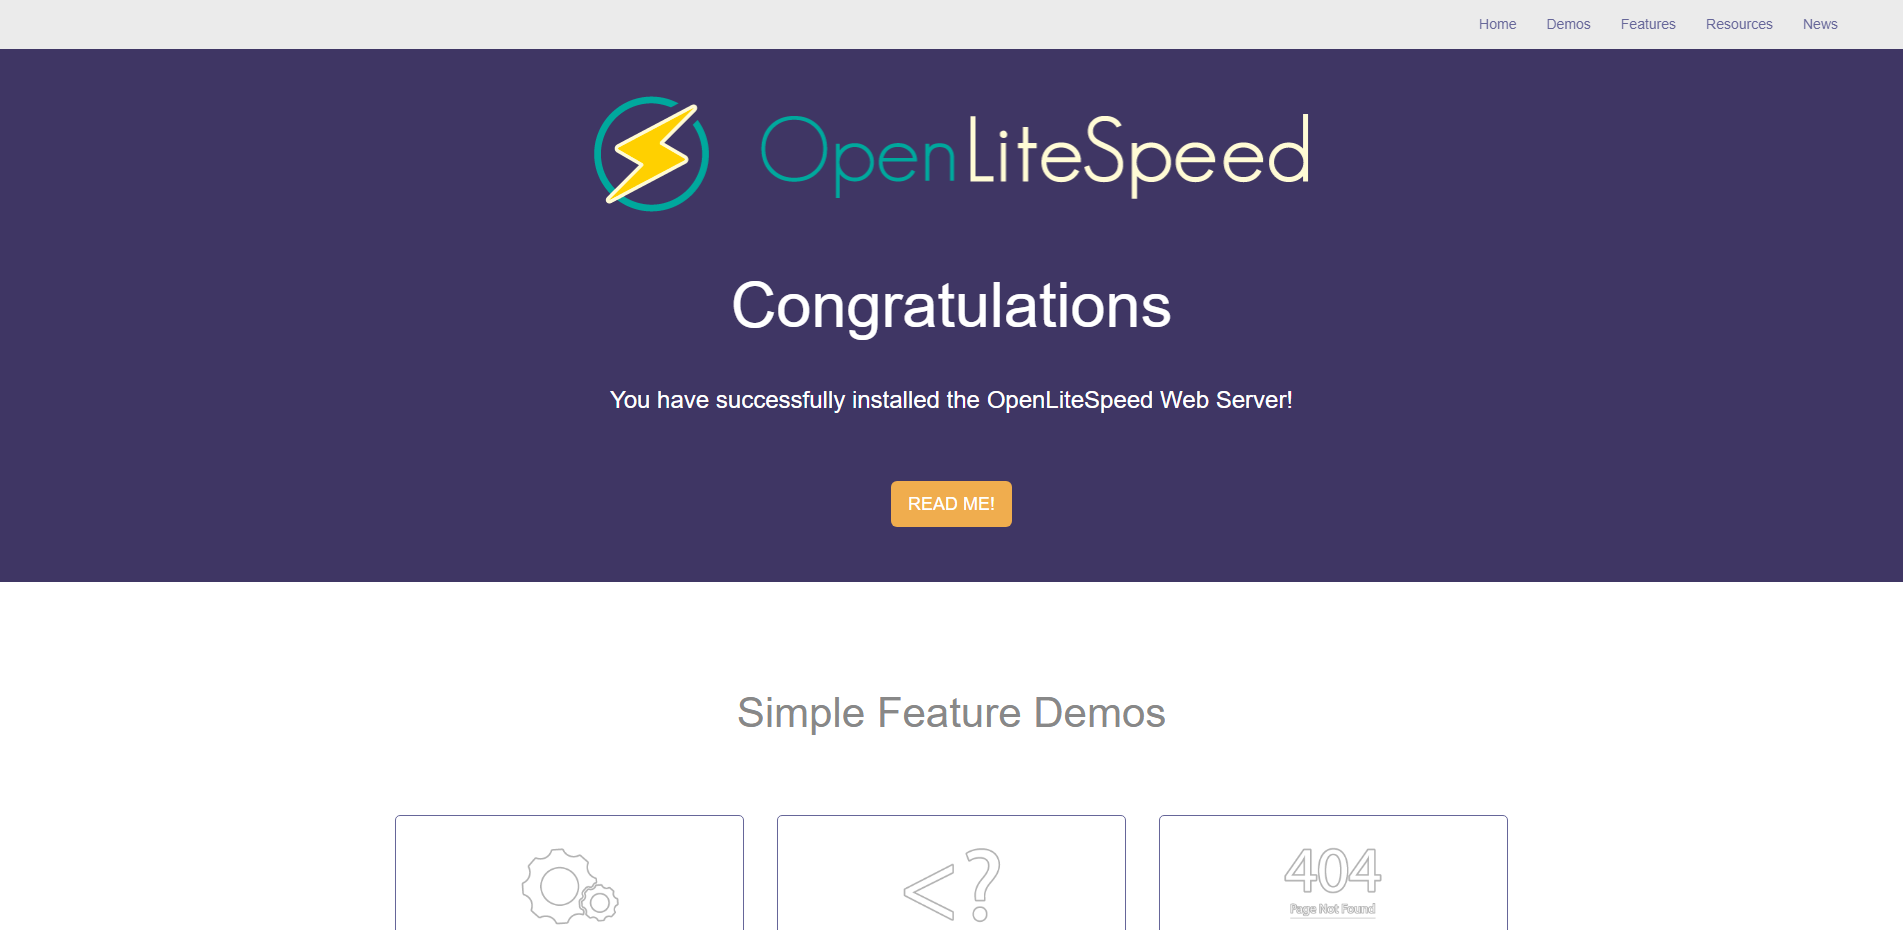
You can look around the example website to explore the features offered by the web server.
To see the GUI-based Admin Panel, access port 7080:
http://your_server_ip:7080
You will likely see a page warning you that the SSL certificate from the server cannot be validated. Because this is a self-signed certificate, this message is expected. Click through the available options to proceed to the site. In Chrome, you must click Advanced and then Proceed to… .
You will be prompted to enter the administrative username and password that you selected with the admpass.sh script in the previous step:
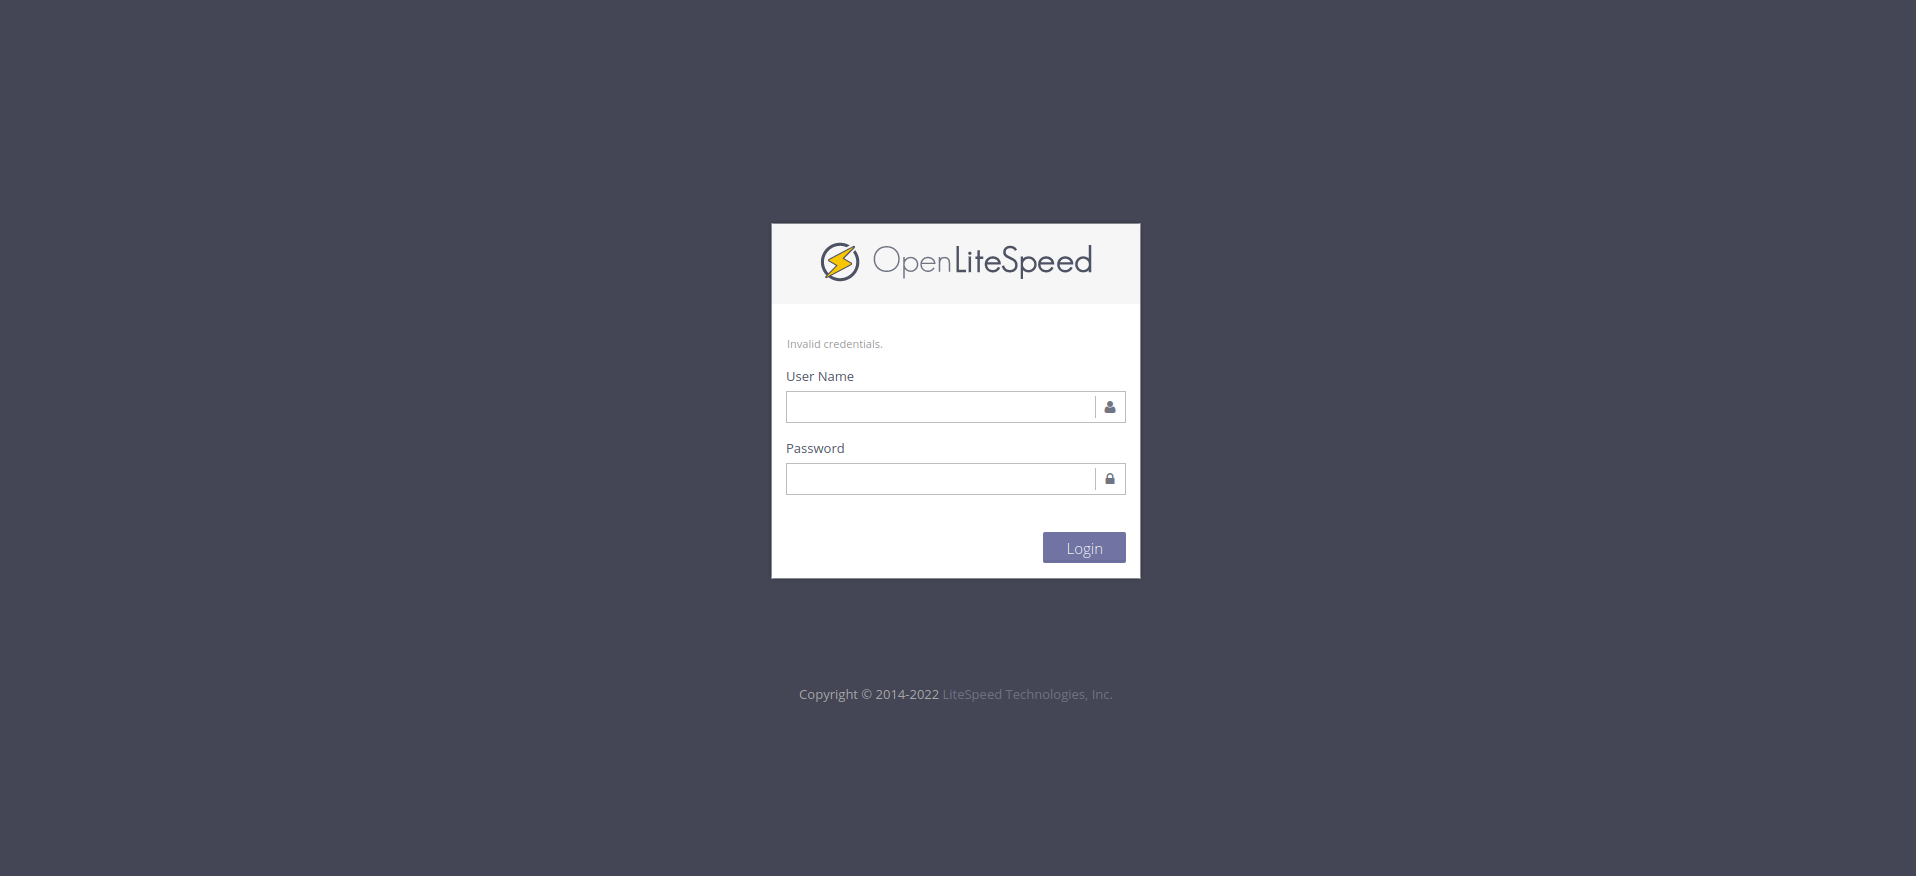
Once authenticated, you will be presented with the OpenLiteSpeed administration interface:
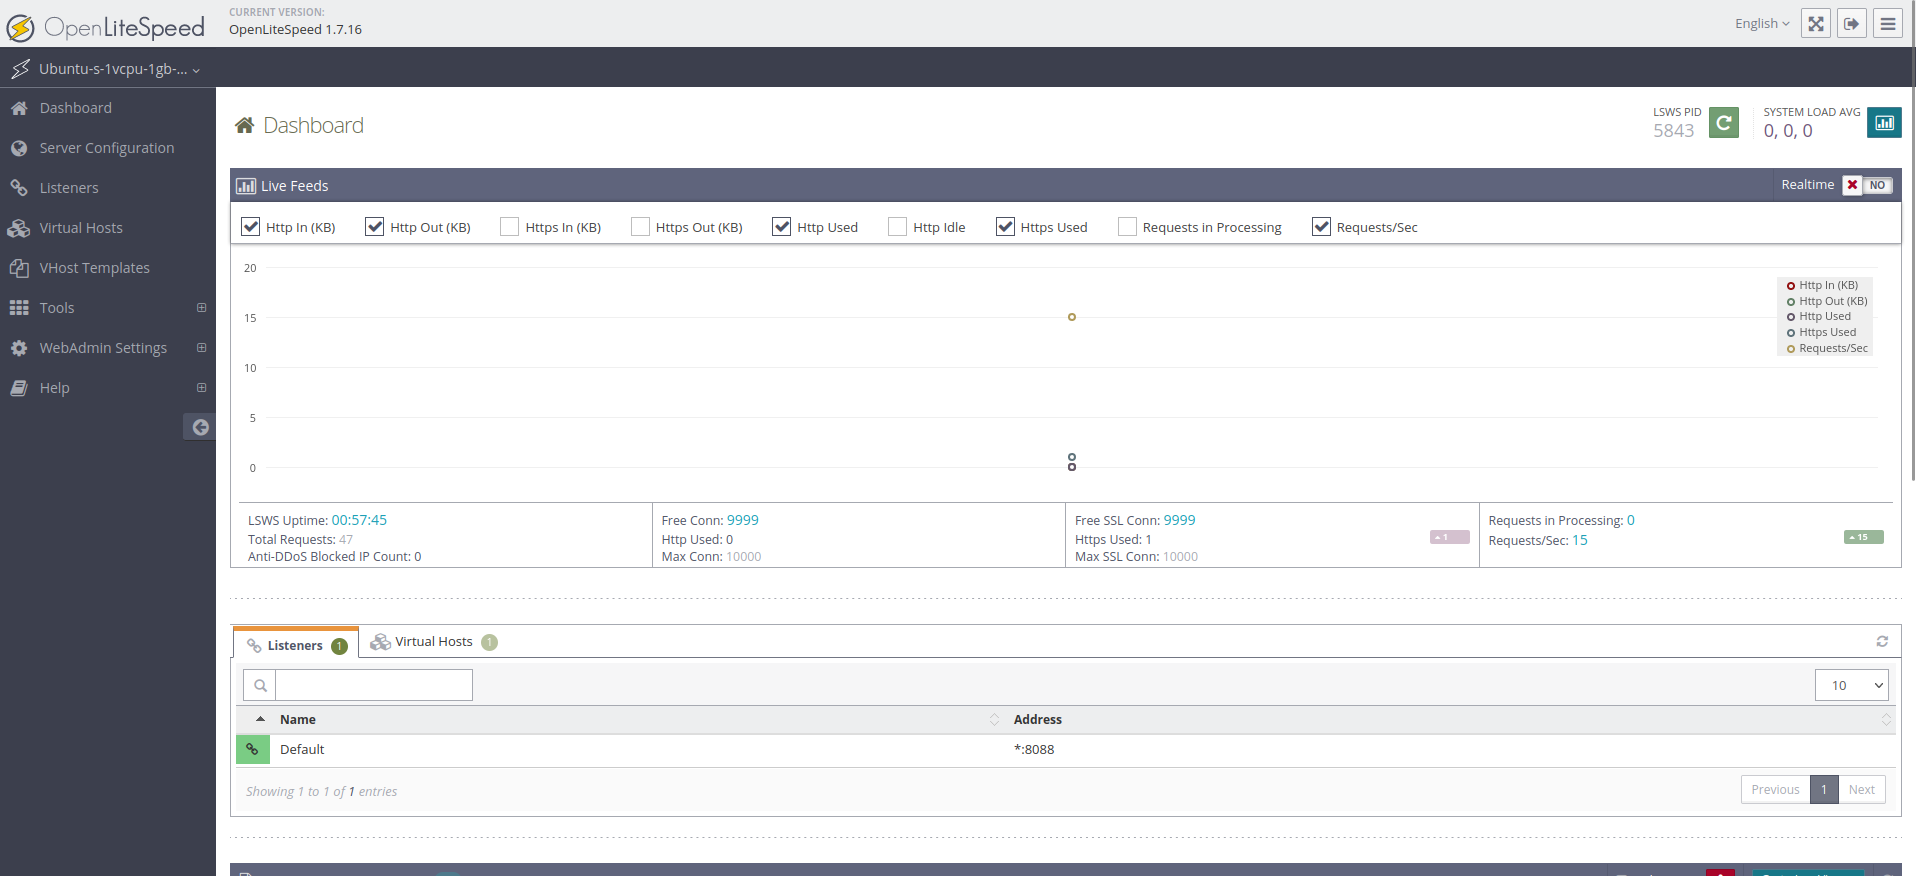
The majority of your configuration for the web server will take place via this dashboard.
1.e. Changing the Port for the Default Page
To demonstrate how to configure options through the web interface, you will change the port that the default site uses from 8088 to the conventional HTTP port (80).
Start by pressing Listeners in the list of options on side navigation bar. A list of all available listeners will load.
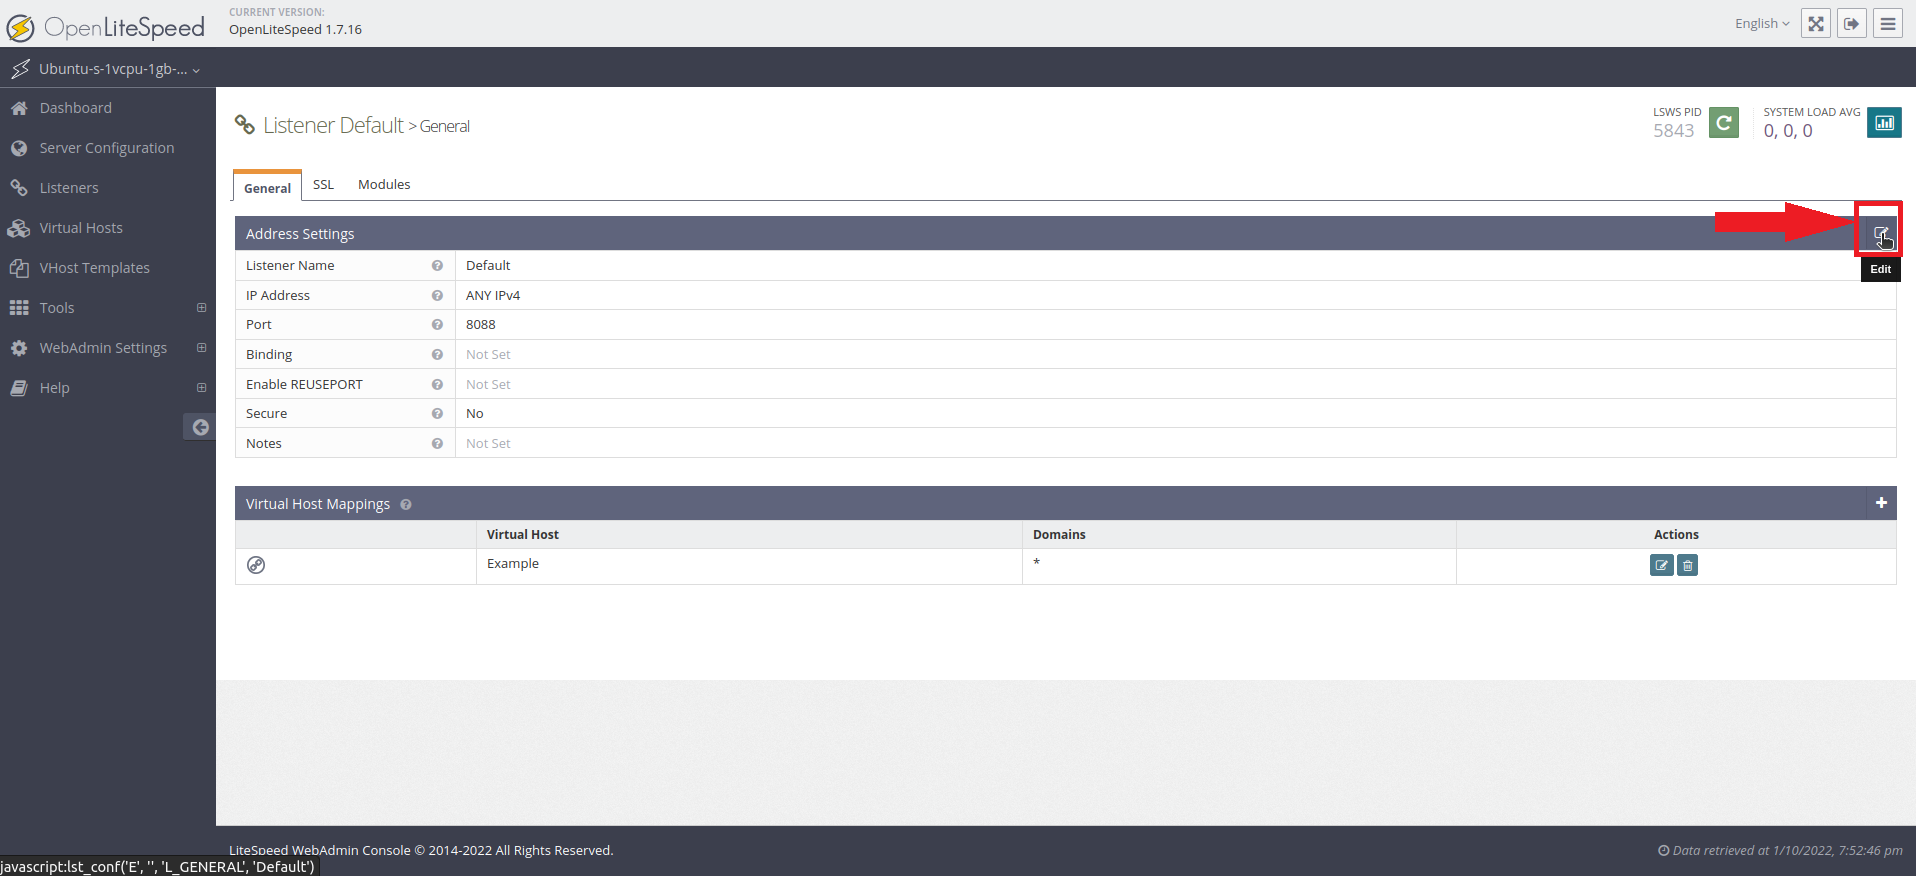
From this list, click the magnifying glass, which is the View button, for the Default listener:
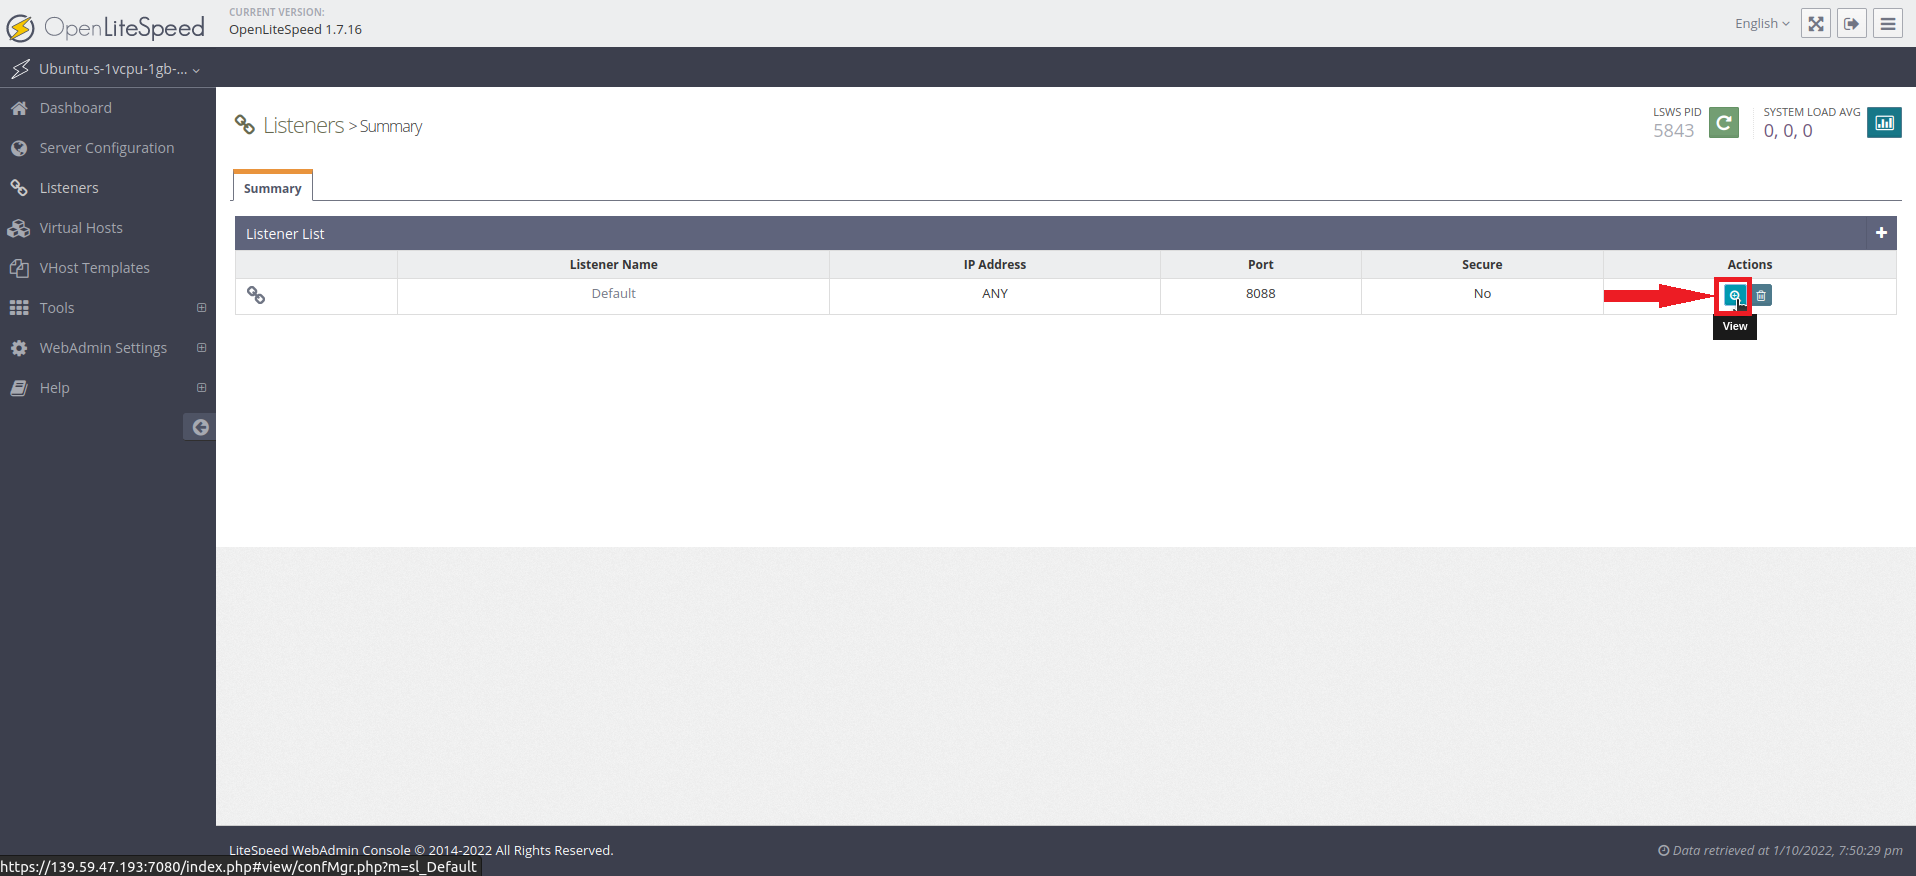
This action will load a page with more details about the Default listener. Click the edit button (the pen and paper symbol) in the top-right corner of the Address Settings table to modify its values:
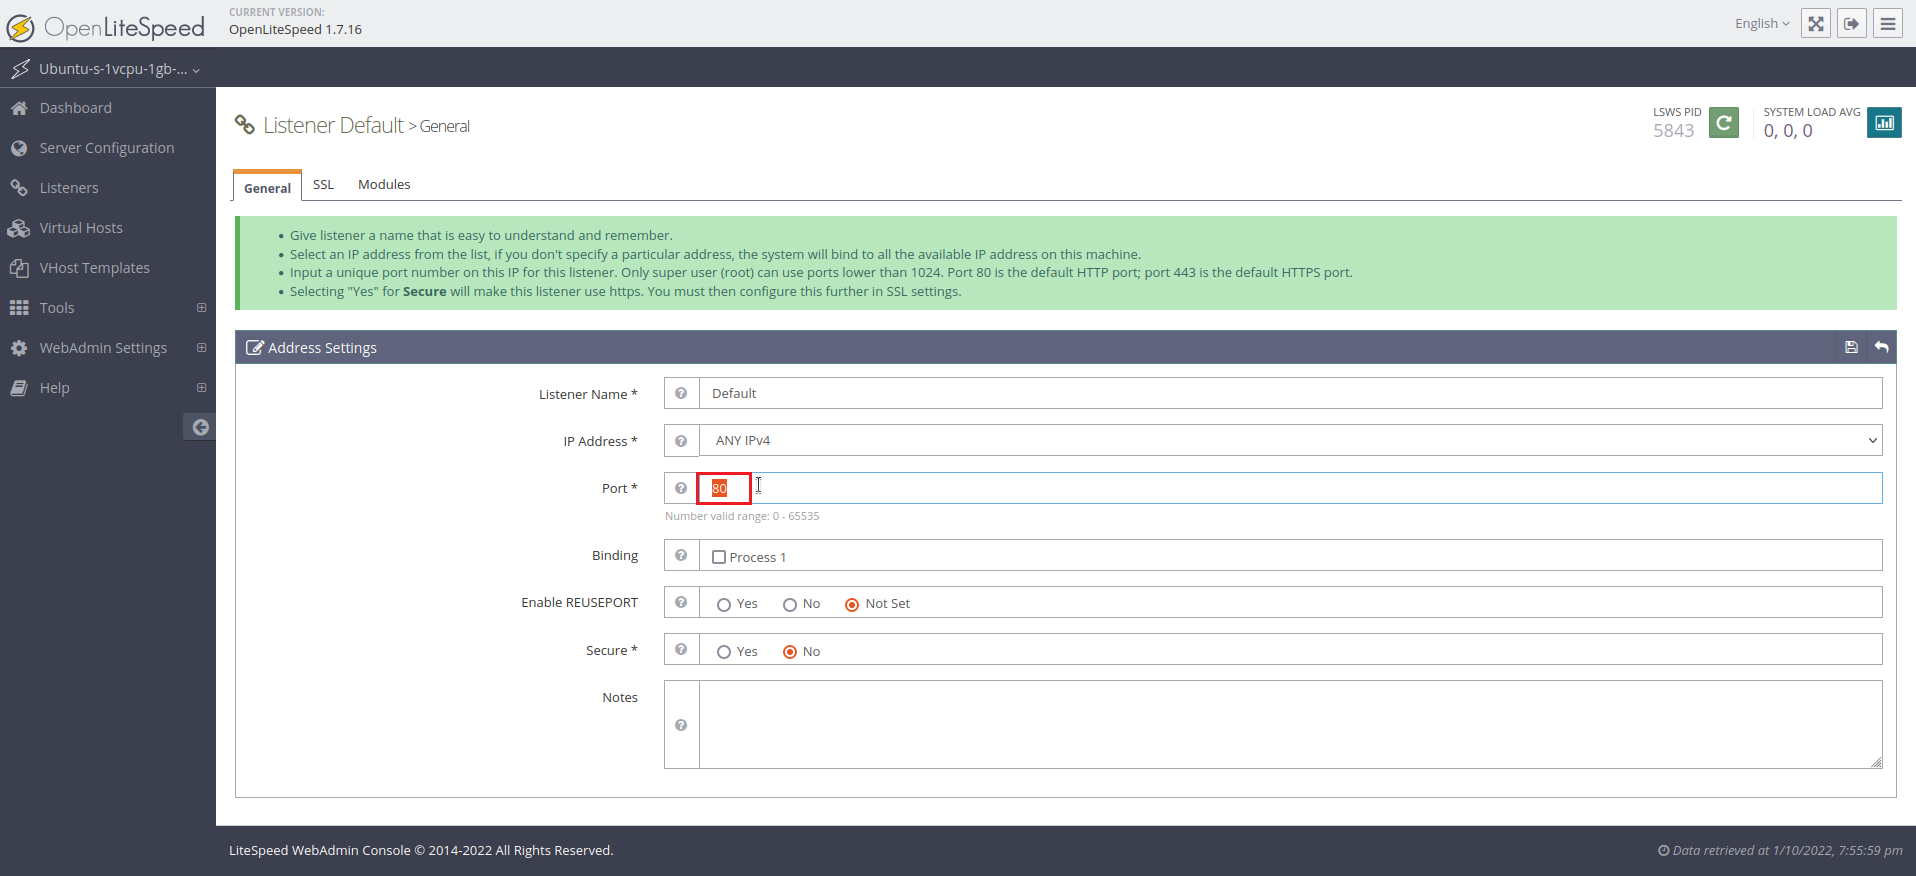
This button will open a new screen. Change port 8088 to port 80, then click the Save button (the floppy disk symbol):
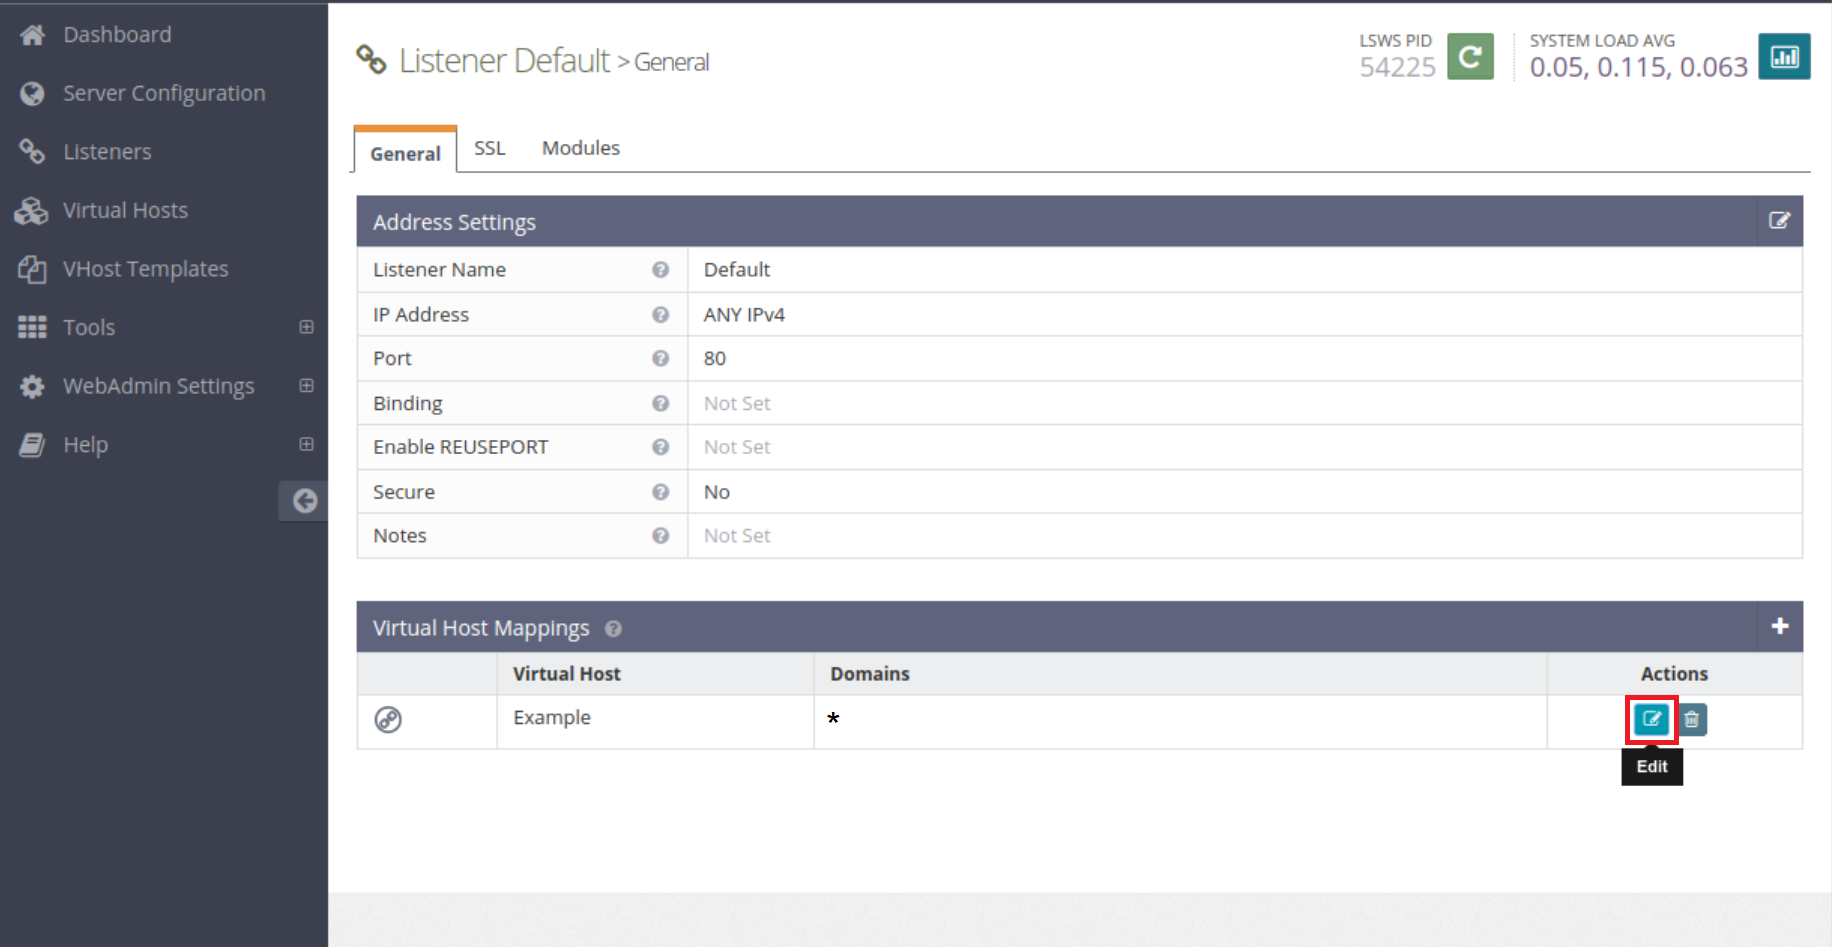
Next, view the Example listener to configure the Virtual host mapping.
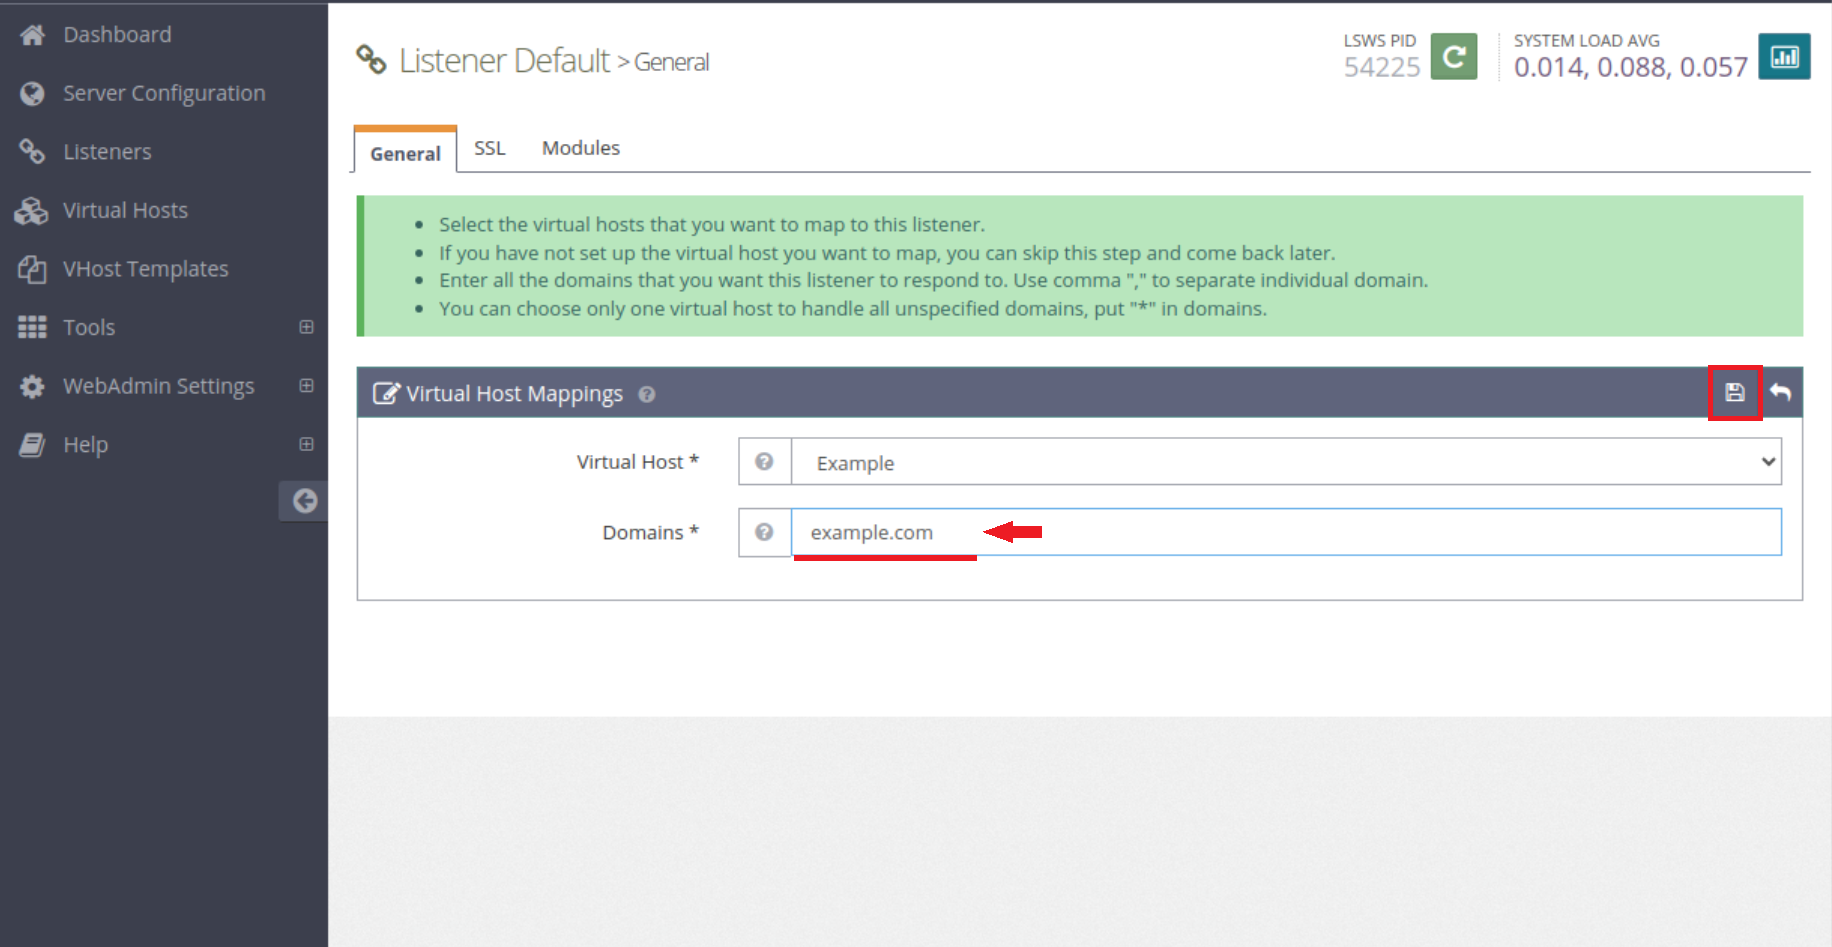
Choose the virtual host and type in your domain name. Save the settings from the save button on the top right corner.
After saving the modification, you will need to restart the server. Click the arrow icon for the Graceful Restart action that will restart OpenLiteSpeed:
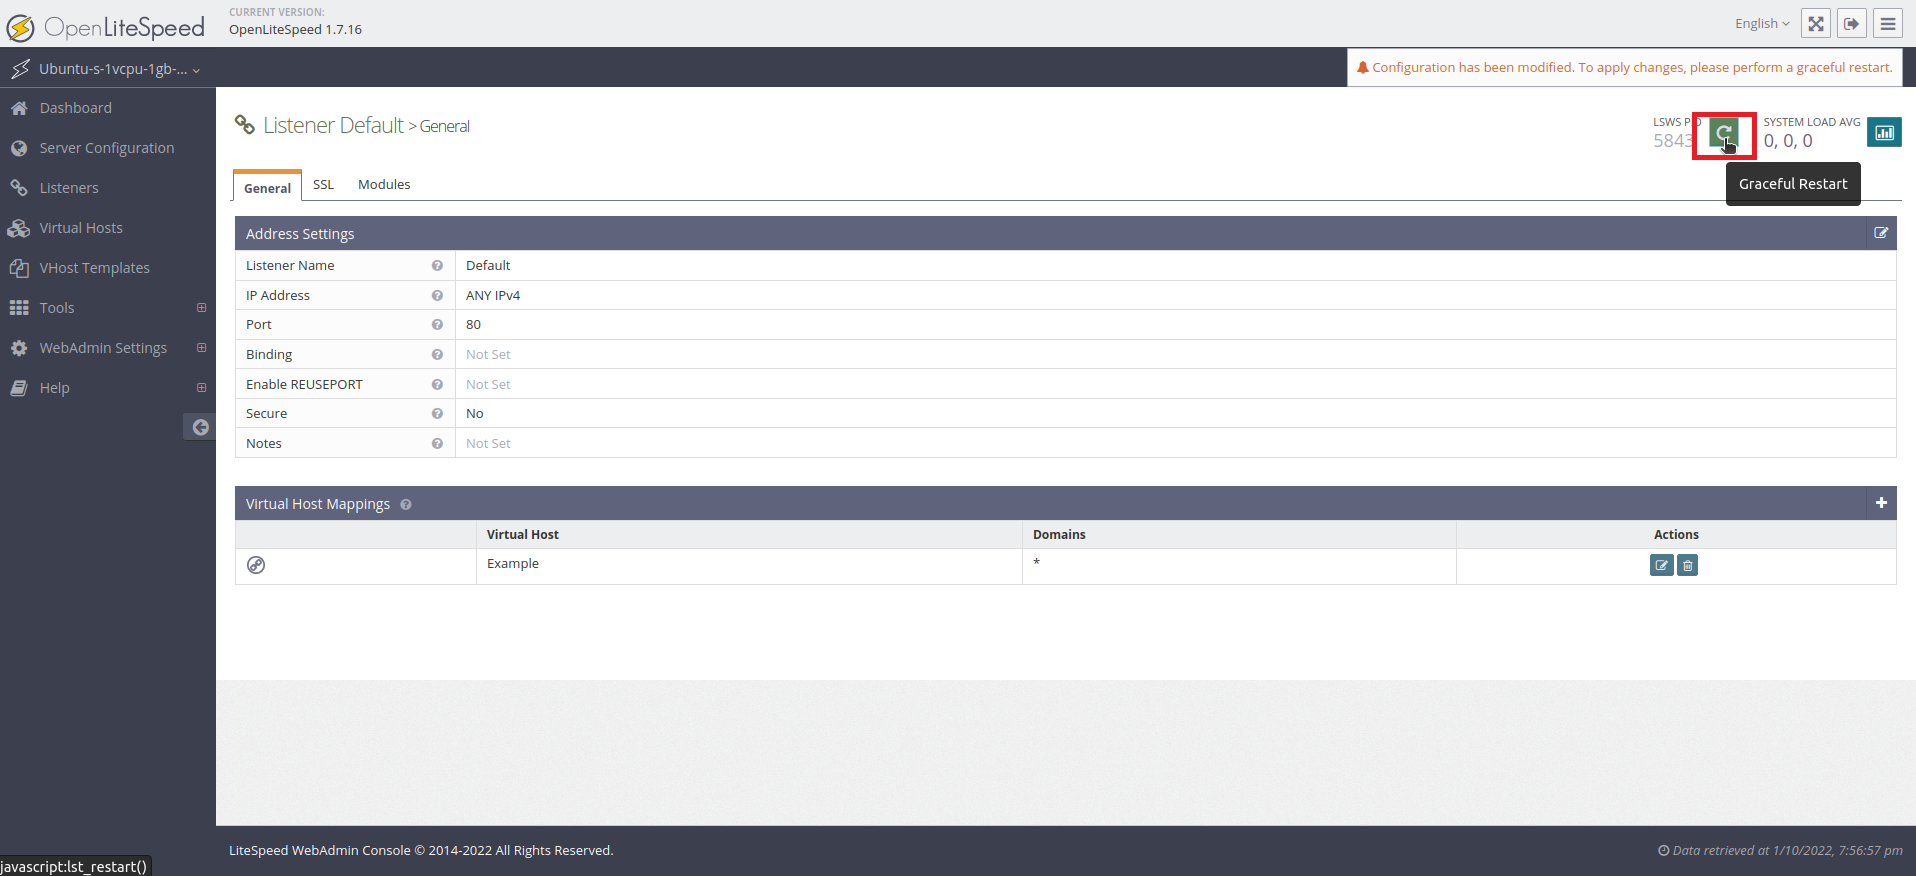
If you are prompted to restart LiteSpeed, press the Go button.
The default web page should now be accessible in your browser on port 80 instead of port 8088. Visiting your server’s domain name or IP address without providing a port number will now display the site.
2. Install some Utility packages
apt install -y git wget curl unzip nano zip
2.a. PHP 8.1+
First add this PPA repository:
add-apt-repository ppa:ondrej/php
Then install php 8.1 with these extensions:
apt update
apt install -y php8.1 libapache2-mod-php8.1 php8.1-mysql \
    php8.1-cli php8.1-common php8.1-fpm php8.1-soap php8.1-gd \
    php8.1-opcache  php8.1-mbstring php8.1-zip \
    php8.1-bcmath php8.1-intl php8.1-xml php8.1-curl  \
    php8.1-imap php8.1-ldap php8.1-gmp php8.1-redis
2.b. Setting Up IonCube
wget http://downloads3.ioncube.com/loader_downloads/ioncube_loaders_lin_x86-64.tar.gz
tar xvfz ioncube_loaders_lin_x86-64.tar.gz
Copy the ion-cube loader to Directory. Replace your yourpath below with actual path that was shown with the first command below..
php -i | grep extension_dir
cp ioncube/ioncube_loader_lin_8.1.so /usr/lib/php/'replaceyourpath'
sed -i '2 a zend_extension = "/usr/lib/php/'replaceyourpath'/ioncube_loader_lin_8.1.so"' /etc/php/8.1/fpm/php.ini
sed -i '2 a zend_extension = "/usr/lib/php/'replaceyourpath'/ioncube_loader_lin_8.1.so"' /etc/php/8.1/cli/php.ini
systemctl restart lsws
systemctl restart php8.1-fpm
2.c. MySQL
The official Faveo installation uses Mysql as the database system and this is the only official system we support. While Laravel technically supports PostgreSQL and SQLite, we can’t guarantee that it will work fine with Faveo as we’ve never tested it. Feel free to read Laravel’s documentation on that topic if you feel adventurous.
Install Mysql 8.0 or MariaDB 10.6. Note that this only installs the package, but does not setup Mysql. This is done later in the instructions:
For Ubuntu 18.04
sudo apt update
sudo apt install software-properties-common -y
curl -LsS -O https://downloads.mariadb.com/MariaDB/mariadb_repo_setup
sudo bash mariadb_repo_setup --mariadb-server-version=10.6
sudo apt update
sudo apt install mariadb-server mariadb-client
sudo systemctl enable mariadb
For Ubuntu 20.04
sudo apt install dirmngr ca-certificates software-properties-common gnupg gnupg2 apt-transport-https curl -y
curl -fsSL http://repo.mysql.com/RPM-GPG-KEY-mysql-2022 | gpg --dearmor | sudo tee /usr/share/keyrings/mysql.gpg > /dev/null
echo 'deb [signed-by=/usr/share/keyrings/mysql.gpg] http://repo.mysql.com/apt/ubuntu focal mysql-8.0' | sudo tee -a /etc/apt/sources.list.d/mysql.list
echo 'deb-src [signed-by=/usr/share/keyrings/mysql.gpg] http://repo.mysql.com/apt/ubuntu focal mysql-8.0' | sudo tee -a /etc/apt/sources.list.d/mysql.list
sudo apt update
sudo apt install mysql-community-server -y
sudo systemctl start mysql
sudo systemctl enable mysql
For Ubuntu 22.04
sudo apt update
sudo apt install mariadb-server mariadb-client -y
sudo systemctl start mariadb
sudo systemctl enable mariadb
Secure your MySql installation by executing the below command. Set Password for mysql root user, remove anonymous users, disallow remote root login, remove the test databases and finally reload the privilege tables.
mysql_secure_installation
phpMyAdmin(Optional): Install phpMyAdmin. This is optional step. phpMyAdmin gives a GUI to access and work with Database
apt install phpmyadmin
2.d. Install wkhtmltopdf
Wkhtmltopdf is an open source simple and much effective command-line shell utility that enables user to convert any given HTML (Web Page) to PDF document or an image (jpg, png, etc).
It uses WebKit rendering layout engine to convert HTML pages to PDF document without losing the quality of the pages. Its is really very useful and trustworthy solution for creating and storing snapshots of web pages in real-time.
For Ubuntu 18.04 and 20.04
apt-get -y install wkhtmltopdf
For Ubuntu 22.04
echo "deb http://security.ubuntu.com/ubuntu focal-security main" | sudo tee /etc/apt/sources.list.d/focal-security.list
        apt-get update; apt install libssl1.1 -y
        wget https://github.com/wkhtmltopdf/packaging/releases/download/0.12.6-1/wkhtmltox_0.12.6-1.focal_amd64.deb

        dpkg -i wkhtmltox_0.12.6-1.focal_amd64.deb
        apt --fix-broken install -y
Once the softwares above are installed:
3. Upload Faveo
For Faveo Freelancer, Paid and Enterprise Version
Please download Faveo Helpdesk from https://billing.faveohelpdesk.com and upload it to below directory
Navigate to the virtual host root which is /usr/local/lsws/Example/html
cd /usr/local/lsws/Example/html/
mkdir faveo
Extracting the Faveo-Codebase zip file
unzip "faveo.zip" -d faveo
For Faveo Community Version
You may install Faveo by simply cloning the repository. In order for this to work with Apache, you need to clone the repository in a specific folder:
cd /usr/local/lsws/Example/html/
git clone https://github.com/ladybirdweb/faveo-helpdesk.git faveo
You should check out a tagged version of Faveo since master branch may not always be stable. Find the latest official version on the release page
Give proper permissions to the project directory by running:You should check out a tagged version of Faveo since master branch may not always be stable. Find the latest official version on the release page
Give proper permissions to the project directory by running:
chown -R nobody:nogroup faveo
cd faveo
find . -type f -exec chmod 644 {} \;
find . -type d -exec chmod 755 {} \;
4. Configure Litespeed webserver
4.a. Configuring LSPHP 8.1
Via http://your_server_ip:7080, log in to the Admin Panel (using the credentials you just set up) and navigate to the Server Configuration section. Then, click the External App tab.
You will see the following screen:
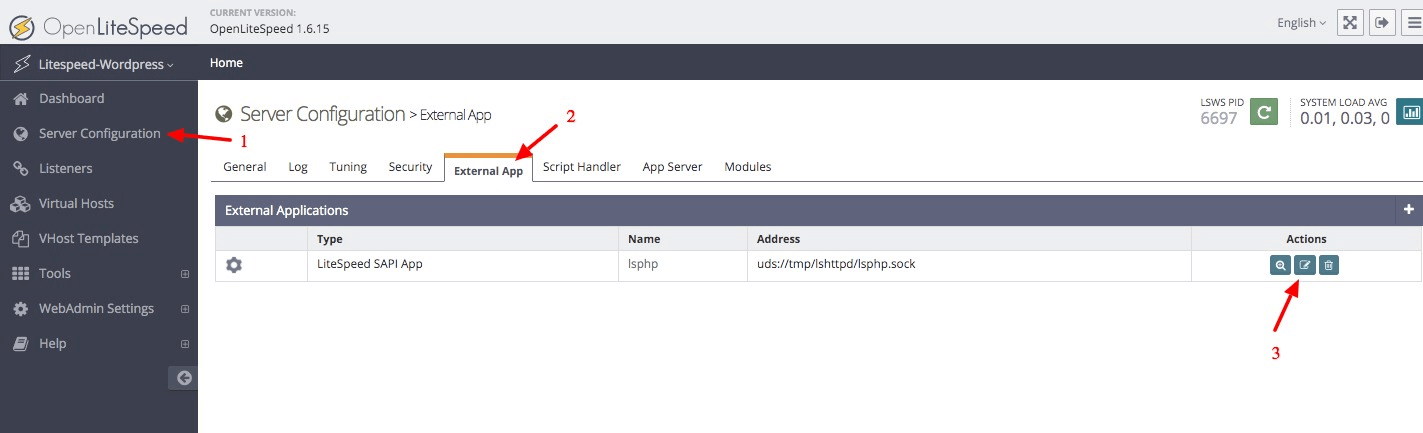
Here, you can configure your server to use any specific PHP processor. For this tutorial, we will use lsphp81.
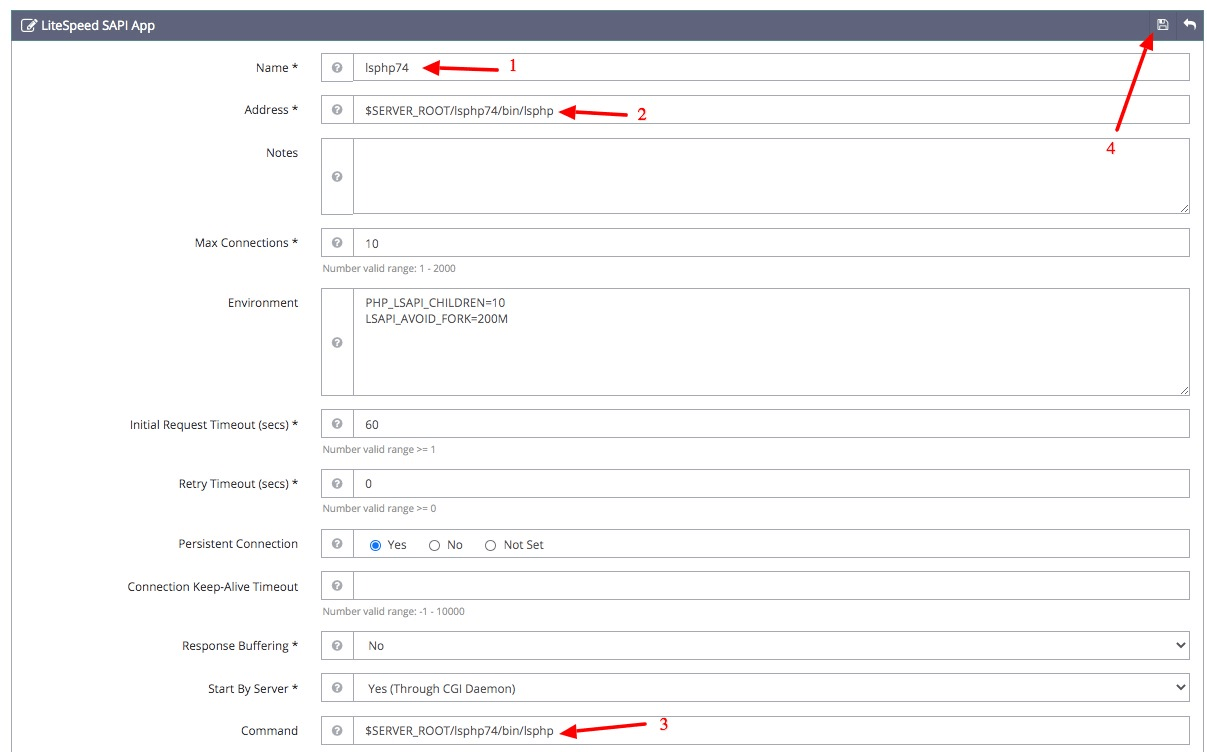
- Replace
lsphpwithlsphp81 - Replace
</b>uds://tmp/lshttpd/lsphp.sock</b>withuds://tmp/lshttpd/lsphp81.sock - Replace
lsphp74/bin/lsphpwith$SERVER_ROOT/lsphp81/bin/lsphp
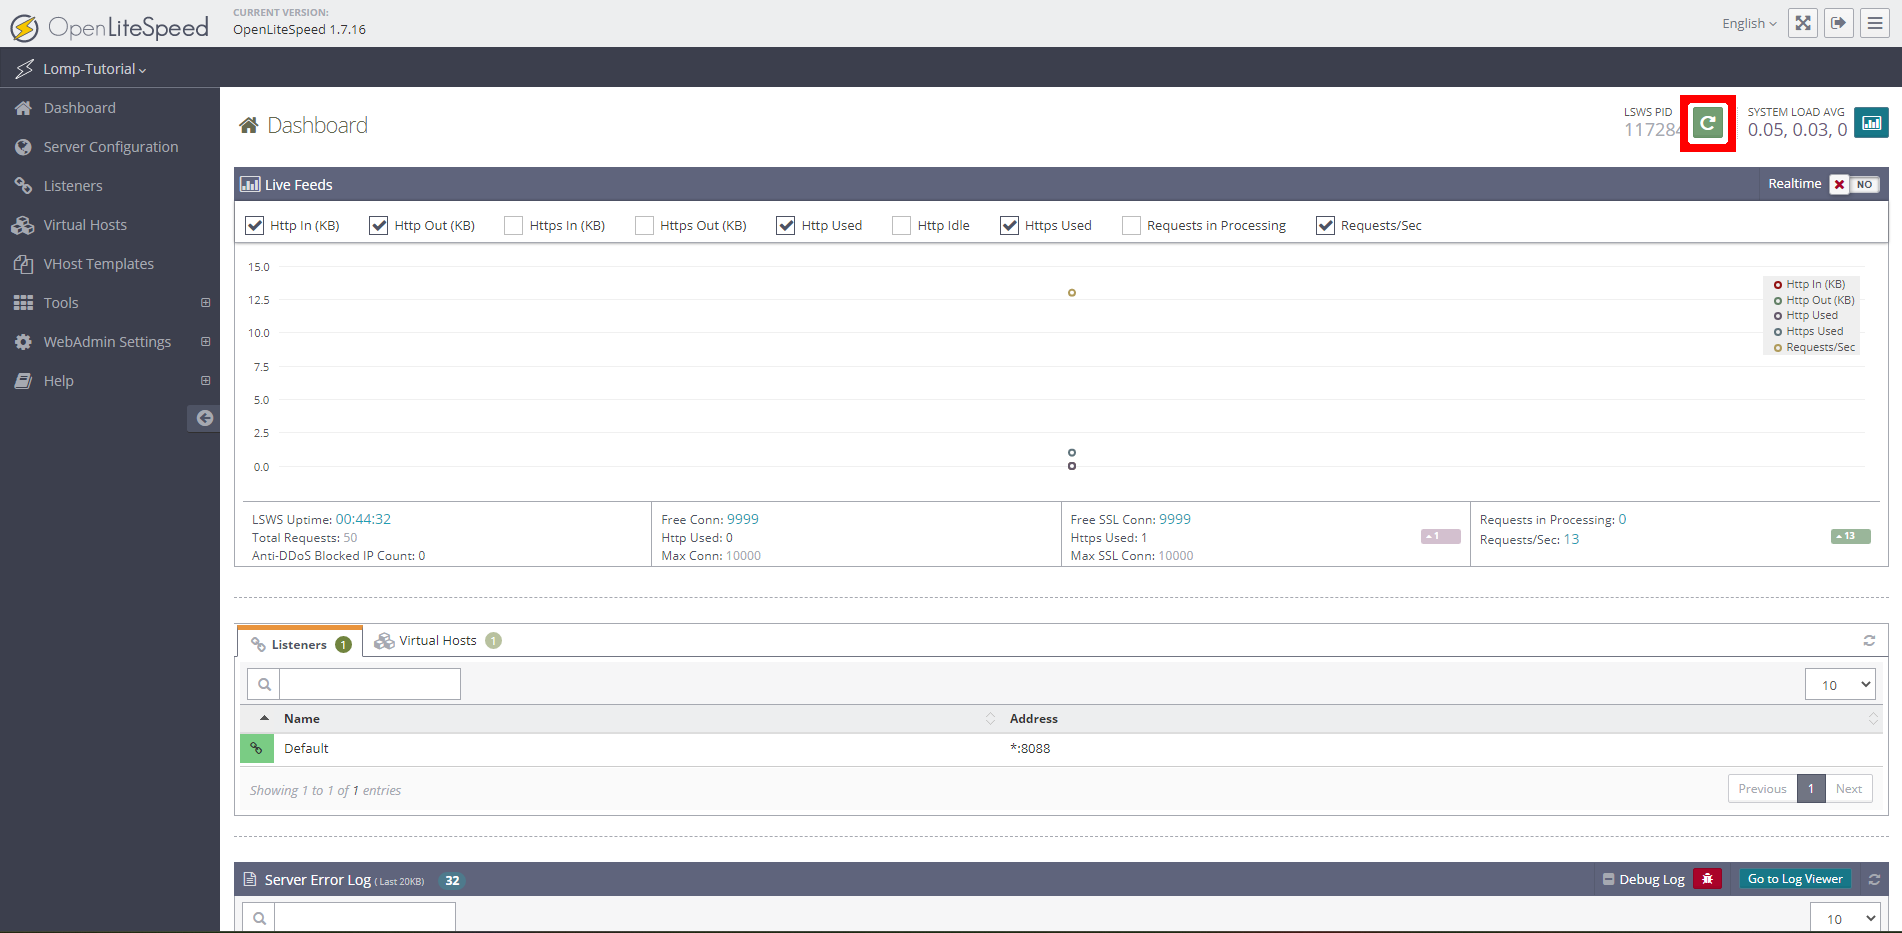
Use the Graceful Restart button in the top right to restart the web server. The Graceful Restart button is highlighted in the upper right of the following screencapture:
Verify that your server is now using the specified PHP version by visiting the informational page at port 8088:
http://your_server_ip/phpinfo.php
After installing LSPHP 8.1, run the commands below to open PHP default config file.
nano /usr/local/lsws/lsphp81/etc/php/8.1/litespeed/php.ini
Then make the changes on the following lines below in the file and save. The value below are great settings to apply in your environment.
file_uploads = On
allow_url_fopen = On
short_open_tag = On
memory_limit = 256M
cgi.fix_pathinfo = 0
upload_max_filesize = 100M
post_max_size = 100M
max_execution_time = 360
4.b Setting Up a Virtual Host
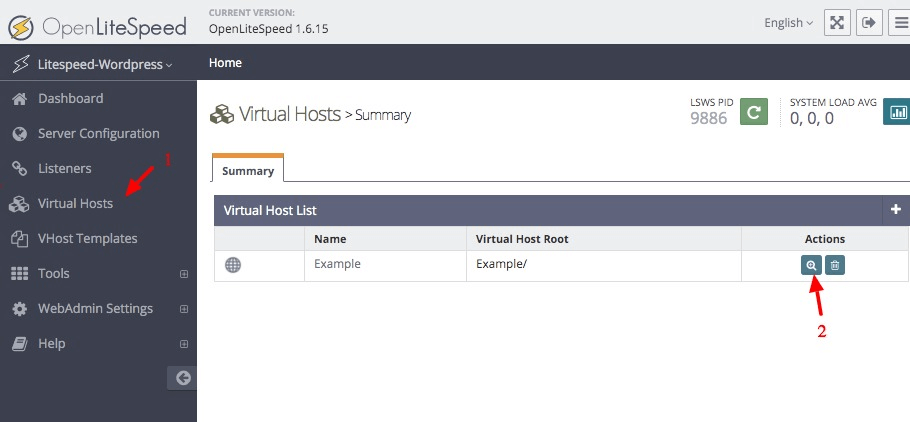
Moving next to configure the rewrite module which is an essential requirement for the WordPress features. Go to the Virtual Hosts and click on the view icon.
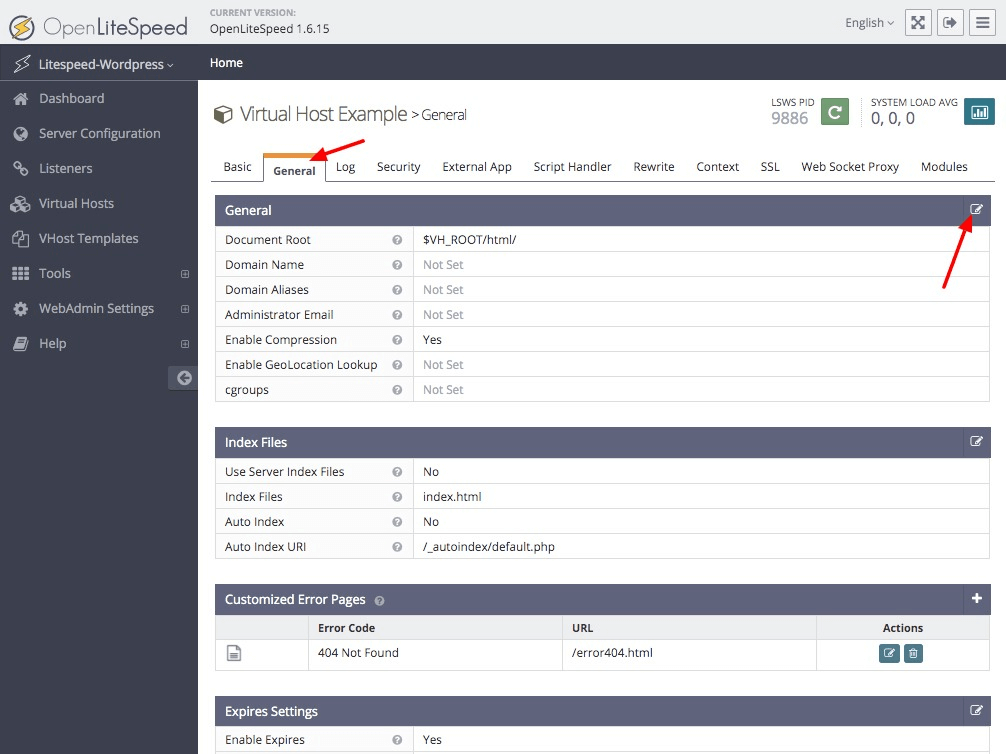
Click on the General tab and edit the General options with the edit icon at the top right corner.
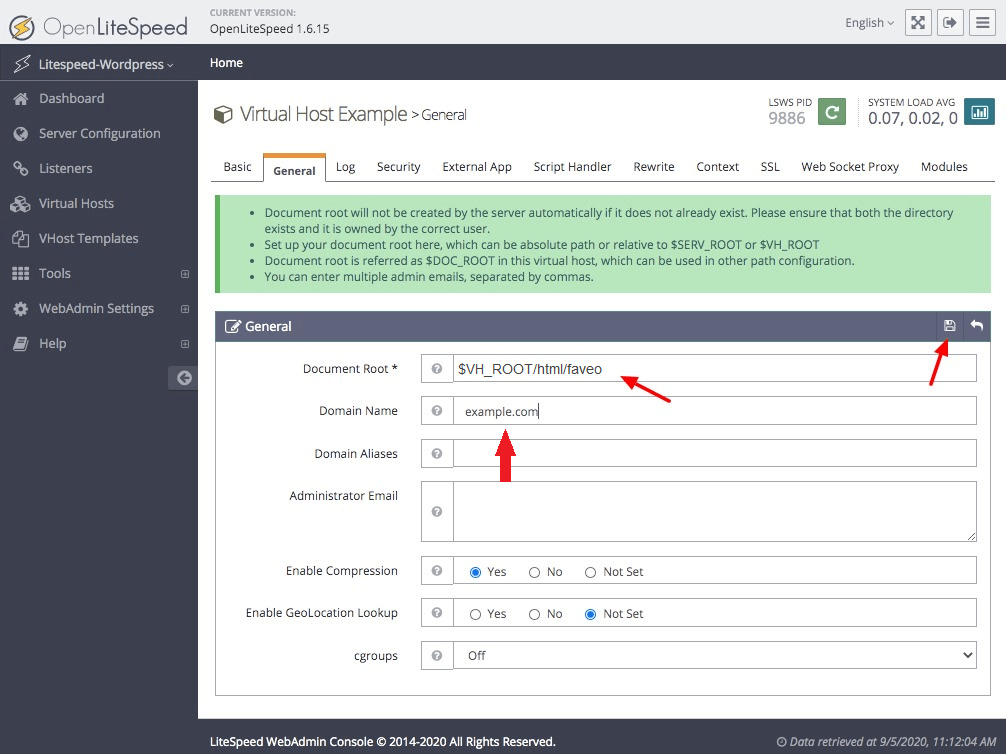
In the Document Root field, type $VH_ROOT/html/faveo
In the Domain Name field, type example.com and click the save button at the top right corner.
Then again on the General tab of Virtual Hosts configuration, click the edit icon next to the Index Files section.
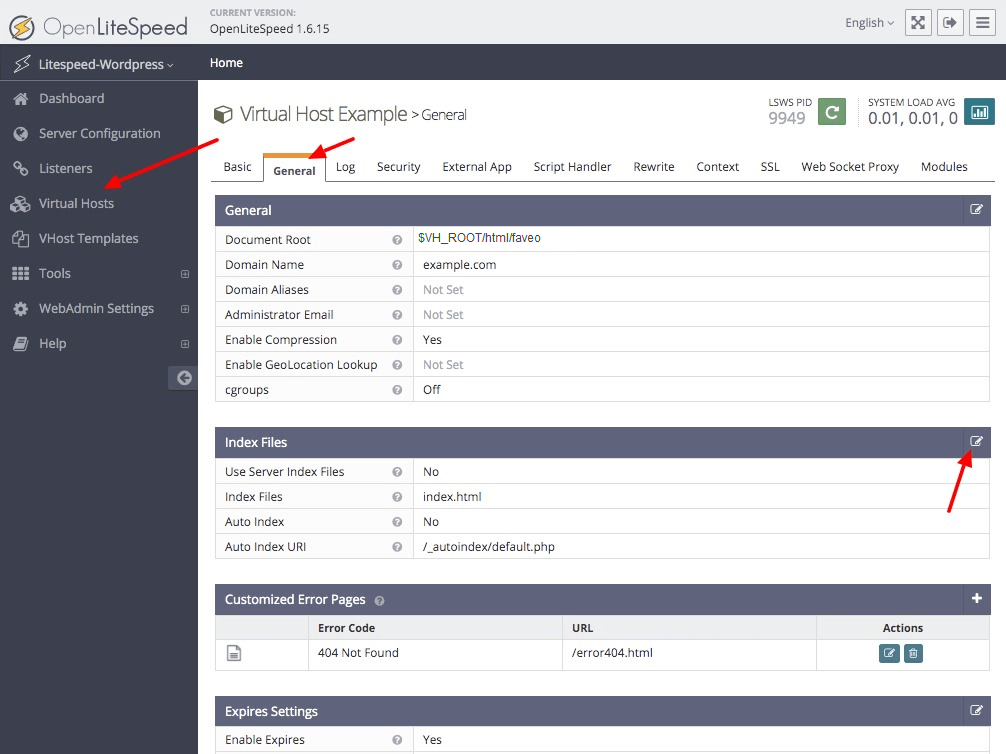
In the Index Files field, add index.php at the beginning of the section. Then click the save button at the top right corner.
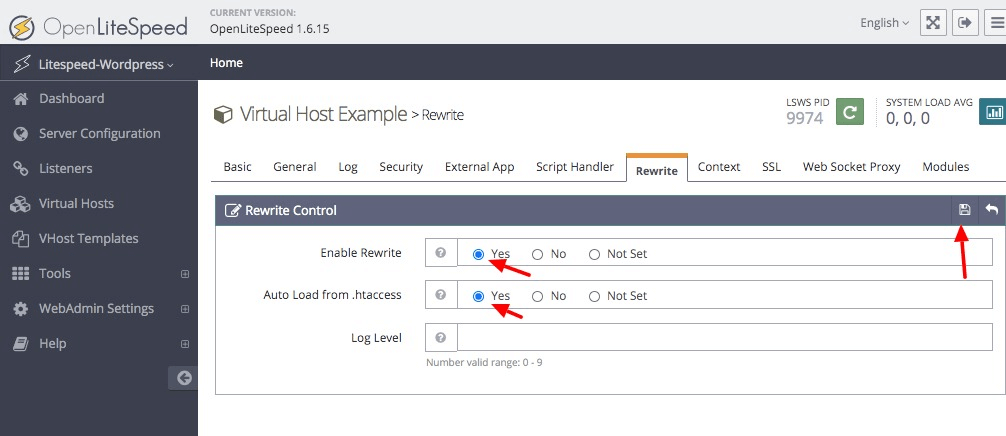
Next, go to the Rewrite tab of the Virtual Hosts configuration view and edit the Rewrite Control options.
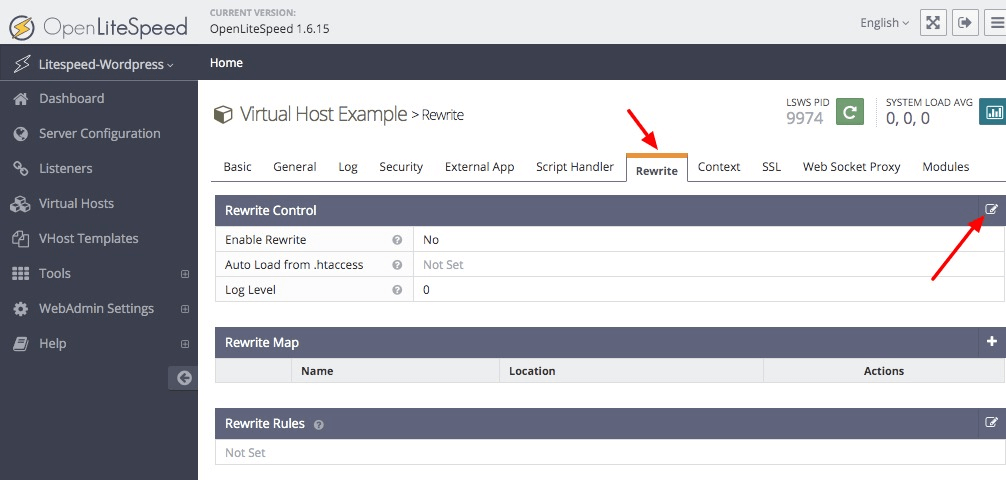
Set Enable Rewrite and Auto Load from .htaccess to Yes and click the save icon at the top right corner.
Once you’ve configured the OpenLiteSpeed server, Click the gracefully restart icon to apply the changes.
5. Setup the database
Log in with the root account to configure the database.
mysql -u root -p
Create a database called ‘faveo’.
CREATE DATABASE faveo;
Create a user called ‘faveo’ and its password ‘strongpassword’.
CREATE USER 'faveo'@'localhost' IDENTIFIED BY 'strongpassword';
We have to authorize the new user on the faveo db so that he is allowed to change the database.
GRANT ALL ON faveo.* TO 'faveo'@'localhost';
And finally we apply the changes and exit the database.
FLUSH PRIVILEGES;
exit
6. SSL Installation
Secure Sockets Layer (SSL) is a standard security technology for establishing an encrypted link between a server and a client. Let’s Encrypt is a free, automated, and open certificate authority.
Faveo Requires HTTPS so the SSL is a must to work with the latest versions of faveo, so for the internal network and if there is no domain for free you can use the Self-Signed-SSL.
Let’s Encrypt SSL installation documentation
7. Configure cron job
Faveo requires some background processes to continuously run. Basically those crons are needed to receive emails To do this, setup a cron that runs every minute that triggers the following command php artisan schedule:run.Verify your php ececutable location and replace it accordingly in the below command.
sudo crontab -e
* * * * * /usr/bin/php -q /usr/local/lsws/Example/html/faveo/artisan schedule:run 2>&1
sudo crontab -l
8. Redis Installation
Redis is an open-source (BSD licensed), in-memory data structure store, used as a database, cache and message broker.
This is an optional step and will improve system performance and is highly recommended.
Redis installation documentation
9. Install Faveo
At this point if the domainname is propagated properly with your server’s IP you can open Faveo in browser just by entering your domainname. You can also check the Propagation update by Visiting this site www.whatsmydns.net.
Now you can install Faveo via GUI Wizard or CLI
10. Faveo Backup
At this stage, Faveo has been installed, it is time to setup the backup for Faveo File System and Database. Follow this article to setup Faveo backup.
11. Final step
The final step is to have fun with your newly created instance, which should be up and running to http://localhost or the domain you have configured Faveo with.